Introduction
There are plenty of discussions nowadays about Containers, Serverless and Functions. These technologies are extremely hot today. They are being developed very rapidly and are making a significant impact on many areas in software engineering. No doubt that FlexDeploy as a fully automated DevOps solution just must support them by definition. This is the first article in a blog series on what makes FlexDeploy a perfect fit for these modern trends in the industry:
- FlexDeploy Loves Containers: Build and Deploy Microservices to Kubernetes Clusters in the Cloud
- Enrich Oracle Container Native Application Development Platform with FlexDeploy Pipelines
- FlexDeploy Loves Functions: Deploy Docker Containers with Fn Functions
- FlexDeploy Loves Functions: Build Docker Containers with Fn Functions
- FlexDeploy is a Container: Run FlexDeploy as a Docker Container
- FlexDeploy Loves Containers: Build FlexDeploy Plugins with Docker
Use Case
There is a microservice in Olympic Games application showing top 5 countries on the medal table. It consists of two layers: UI and BackEnd. UI is implemented with Oracle Jet and BackEnd is built on top of ADF BC exposing REST services. The task is to build each layer separately, package it into a Docker container and deploy the entire solution with FlexDeploy Pipelines across environments represented by Kubernetes clusters.

Solution

- The source code of the microsrvice is stored in GitHub.
- Each microservice layer is configured as a project in FlexDeploy
- Whenever the code is changed, FlexDeploy CI server is triggered and starts building a project
- As the result of the building process FlexDeploy builds a Docker image and pushes it to Docker Hub repository
- For the UI project the Docker image contains Ubuntu + Nginx + Oracle Jet Web folder
- For the Backend project the Docker image contains Ubuntu + Tomcat + WAR file
- There is a Release configured in FlexDeploy. The release represents the entire microservice and consists of two projects: UI and Backend correspondently.
- Once the build process is finished FlexDeploy creates a snapshot of the microservice containing yaml files referring to Docker images in the Docker Hub repository.
- FlexDeploy Pipeline uses the snapshot to deploy the microservice (two Docker containers) across environments (Dev, Test, Prod).
- Each environment is a Kubernetes cluster running in the cloud. For Dev we use Oracle Container Engine and for Test and Prod we use Google K8S Engine.
Implementation

There are JetFrondEnd and JavaBackEnd projects for the UI and BackEnd layers of the microservice.
The release is referring to a simple pipeline definition (read more on pipelines here):

Alrighty, let’s have a look at the workflows that FlexDeploy uses to build projects, to create Docker images and to push them to the Docker Hub repository. A build workflow for the JetFrondEnd project looks like this:
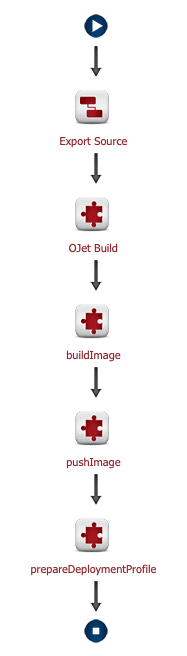
It fetches the source code from GitHub and builds Oracle Jet application (we are not focusing on this step here). The next step buildImage is putting everything into a container. It invokes FlexDeploy Docker plugin buildImage operation:
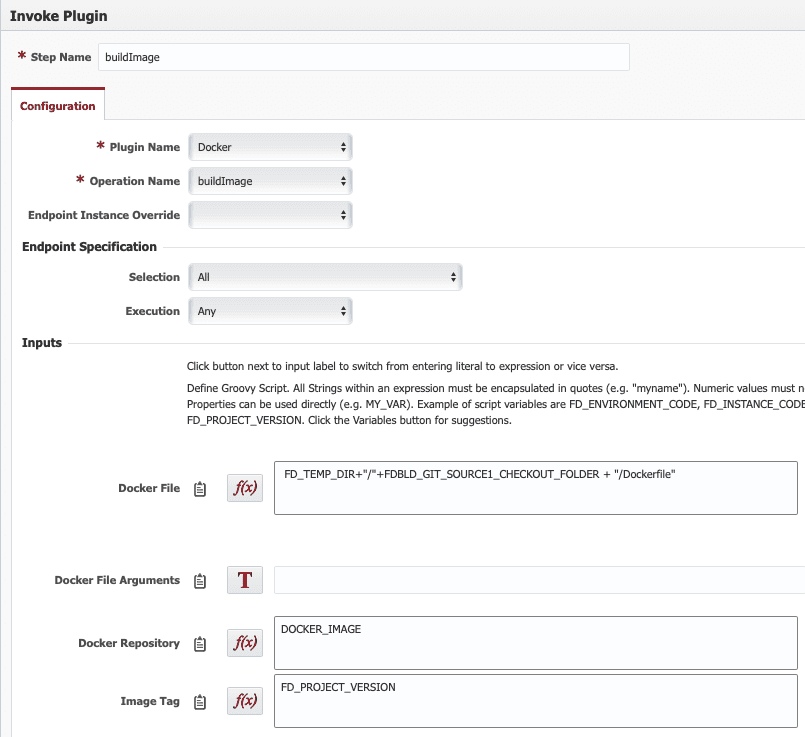
So, basically it creates a Docker image with a name provided by a project-scoped workflow property DOCKER_IMAGE and with a tag corresponding to the project build version. It’s going to result in something like this: eugeneflexagon/jsfrontend:1.0.53. The Docker build command operates with Dockerfile stored in the source code and having the following content:
FROM nginx:1.10.2-alpine

COPY web /usr/share/nginx/html

EXPOSE 80
It takes Nginx Docker container image from Docker Hub, copies the result of Oracle Jet Build step (web folder with html, css and js) to the Nginx web server and exposes 80 port.
Once the image is built we push it to the repository with pushImage step. The step invokes FlexDeploy Docker plugin pushImage operation:

The end point where this workflow step is being executed has preinstalled Docker engine and it is preconfigured with credentials for the Docker Hub repository.
apiVersion: extensions/v1beta1
kind: Deployment
metadata:
  name: olympics-jsfrontend
  namespace: efedorenko
  labels:
    run: olympics-jsfrontend
spec:
  replicas: 1
  strategy:
    rollingUpdate:
      maxSurge: 1
      maxUnavailable: 1
    type: RollingUpdate
  template:
    metadata:
      labels:
        run: olympics-jsfrontend
    spec:
      containers:
      - image: ${{DOCKER_IMAGE}}:${{FD_PROJECT_VERSION}}
        imagePullPolicy: Always
        name: olympics-jsfrontend
        ports:
        - containerPort: 80
          protocol: TCP
      imagePullSecrets:
      - name: wrelease
      restartPolicy: Always
---
apiVersion: v1
kind: Service
metadata:
  name: olympics-jsfrontend-svc
  namespace: efedorenko
spec:
  selector:
    run: olympics-jsfrontend
  ports:
    - port: 8088
      targetPort: 80
  type: ClusterIP
The name of this template is provided by a project-scoped workflow property DEPLOYMENT_TEMPLATE.
Actually, this is nothing else than a Kubernetes deployment profile. The workflow uses FlexDeploy File plugin to replace ${{}} expression with the exact image name.
The result is a yaml file which is going to be saved to the FlexDeploy artifact repository by the last workflow step saveArtifact.

The build workflow for the JavaBackEnd project follows the similar concept:
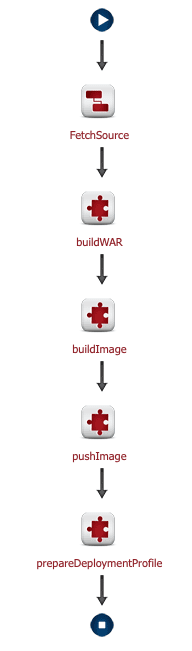
It builds a Docker image with the following Docker file:
FROM eugeneflexagon/adftomcat:1.0

COPY javabackend.war /usr/local/tomcat/webapps
The step takes eugeneflexagon/adftomcat:1.0 image from Docker Hub containing a preconfigured for ADF applications Tomcat server (see how to build that image here) and copies WAR file to the Tomcat’s web folder. The result of the workflow (an artifact) is also a yaml file referring to the new Docker image.
FlexDeploy will use these two yaml files (K8s deployment profiles) packed into a snapshot to deploy the Docker containers to Kubernetes environments with a pipeline. In order to make it happen we have to configure our projects with a workflow deploying a container to a K8s cluster:
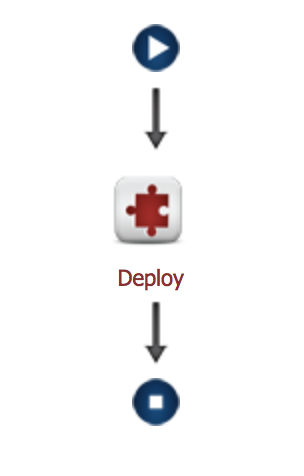
It has only one single step Deploy which invokes FlexDeploy Kubernetes plugin apply operation:
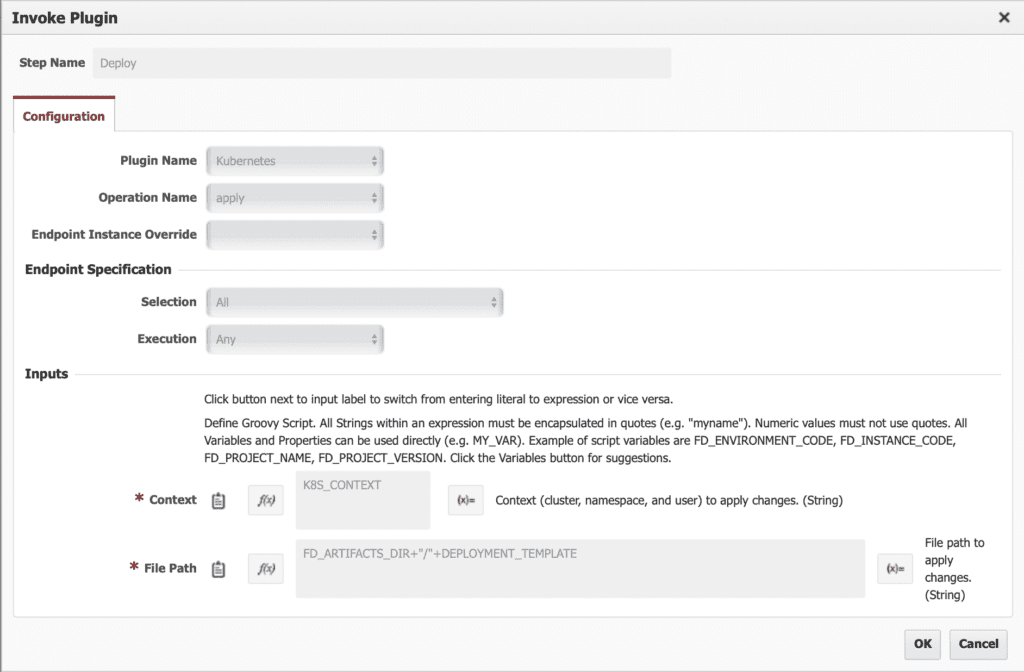
The endpoint where this workflow step is being executed has preinstalled kubectl (K8s command line interface) and it has been preconfigured with three K8s cluster credentials (or K8s contexts) for Dev, Test and Prod respectively. The name of the K8s context is an instance-scoped property of the workflow. So at first, the workflow step switches to the appropriate K8s context and then deploys a container to the cluster with a yaml file (DEPLOYMENT_TEMPLATE) which is an artifact produced by the build workflow. This deploy workflow is used by both JetFrontEnd and JavaBackEnd projects.
Summary
Having done that we have built a CI/CD vehicle for the Microservice development which operates with Docker containers as deployable artifacts and considers target environments as Kubernetes clusters in the cloud. Furthermore, in this solution we can leverage the full power of FlexDeploy Pipelines and enjoy all the benefits such as approval gates, scheduled events, manual steps, test automation and many others.
That’s it!
Next Post: Enrich Oracle Container Native Application Development Platform with FlexDeploy Pipelines