To increase the productivity and quality of your projects, every organization should automate the lifecycle of SOA and BPM flows. In this post, I provide a detailed explanation on how we make it easy to automate the Build, Deploy & Test process of SOA composites using FlexDeploy.
To increase quality of your integration flows, you should automate the testing. SOA Suite provides the testing capability for your composites by initiating the tests with static input or loading the input from file system and also provides emulation for outbound services output/callback/fault. You can find detail instruction here at oracle documentation on how to create Test Suites for your composite. It provides the ability to test your composites when dependent composites are not ready or you don’t want to create data in environments such as production.
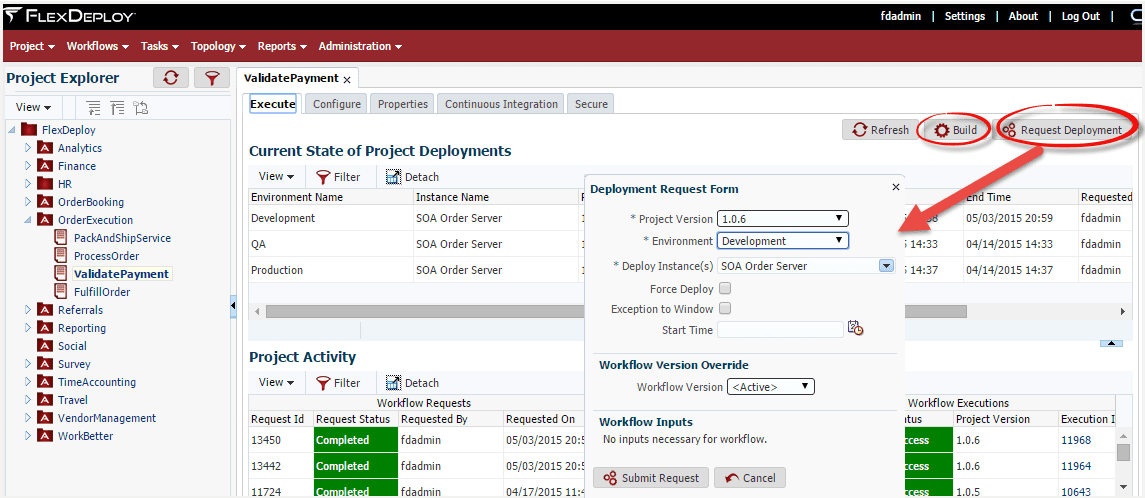
To provide better context of the end result of this automation, I will start with the an overview of the the SOA Deploy request processes and results of the execution. Then walk through the steps required to create the build, deploy, test workflows within FlexDeploy. In many cases, these workflows will be reusable across composites.
SOA Deploy Request
View Execution Results of the Deployment
Once the build or deploy is submitted, FlexDeploy shows the execution step information and provides the ability to drill into detail, to view the artifacts created from the build, and to view what source code changed, and other relevant information associated with the workflow execution.
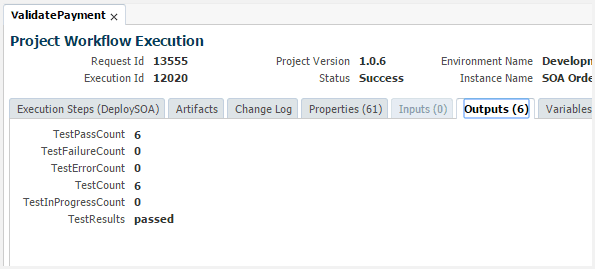
View Test Results
You can see the test results and other details like the count of the tests, how many passed, etc. You can choose to fail the deploy process based on the number of test failures etc.
You can automate the process by configuring Continuous Integration for your project. By using continuous integration, you can notify the developer of the flow when it fails.
Below are the Plugin and Workflow configurations needed to achieve this. These are one time easy steps to automate SOA build and deploy using FlexDeploy user interface. I used ValidatePayment project for this post. You can download this project with Test Suite from Oracle samples site.
Upload the SOA plugin
FlexDeploy provides plugins for most of the Fusion Middle ware products. In this example, we upload the SOA plugin to build, deploy and manage SOA composites.
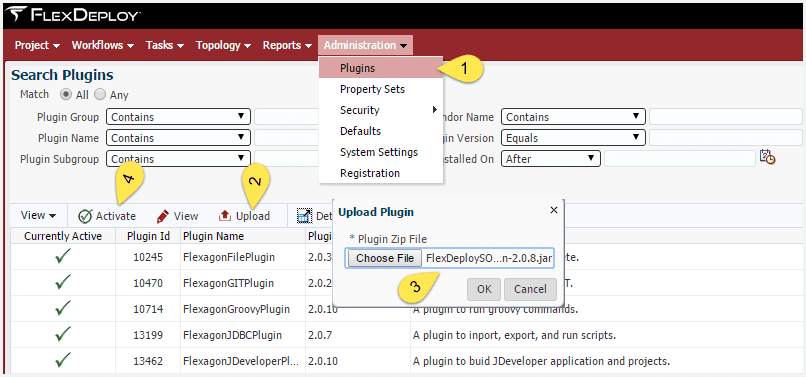
- Click on the Plugin Menu item under the Administration.
- Click on the Upload button
- Click on Choose File and select the SOA plugin jar and click on OK
- Select the uploaded SOA Plugin and click on Activate button.
Create Workflows
FlexDeploy provides the ability to create build, deploy and test activities by using Workflows. Create separate workflows for build and deploy using ‘Manage Workflows’ menu item under Workflows. Once configured, you can reuse the Workflows for all SOA Composite deployments.
Create SOA Build workflow
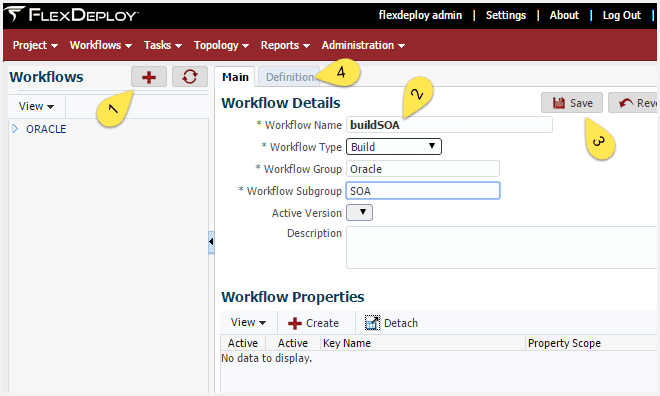
- Click on the + button to create new workflow.
- Enter Workflow Name, Select Type as Build, enter group and sub groups.
- Click on Save
- Click on Definition to define the workflow for Build.
SOA Build workflow Definition
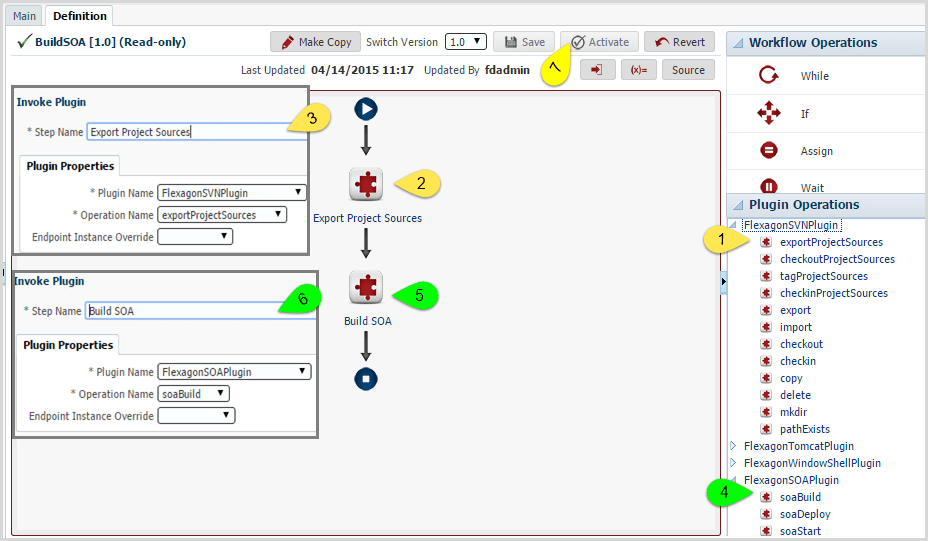
FlexDeploy provides easy drag and drop editor to define your workflows. Build workflow involves getting the source code and building the SAR file.
- Drag exportProjectSources operation from FlexagonSVNPlugin under Plugin Operations Note, if you are using some other source control like GIT, use appropriate operations.
- Drop it on the flow after Start
- When the Invoke Plugin popup displays, enter Step Name, leave others as defaulted and click OK.
- Now drag soaBuild from FlexagonSOAPlugin under Plugin Operations section.
- Dropt it on the flow after Export Project Sources
- When the Invoke Plugin popup displays, enter Step Name, leave others as defaulted and click
- Now activate the workflow by clicking on the Activate
Create SOA Deploy workflow with Test
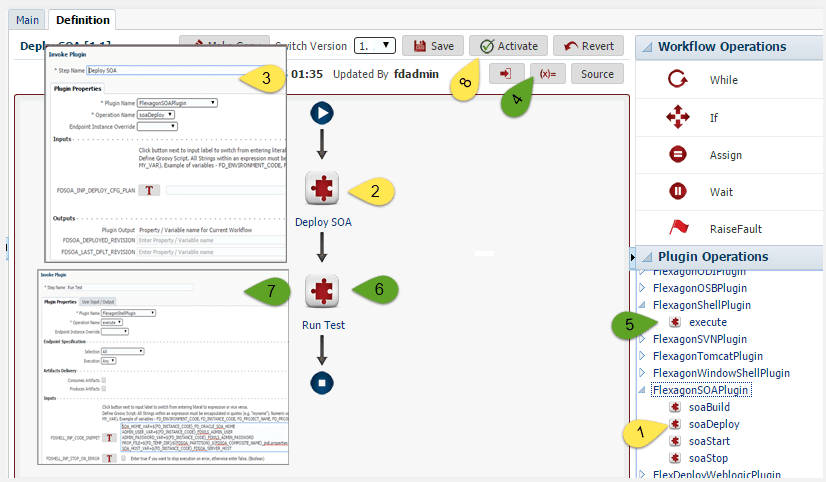
Repeat the steps to create the workflow for deploy, name the workflow as deploySOA. Create the workflow definition as below.
- Drag soaDeploy operation from FlexagonSOAPlugin under Plugin Operations
- Drop it on the flow.
- When the Invoke Plugin popup displays, enter Step Name as Deploy SOA, leave others as defaulted and click OK. If you need to replace the environment specific fields, refer to the Greg Draheim’s blog on Configuration Plans for SOA.
- To Run Test after deployment follow these steps, otherwise skip to step 8. I would like to have test results returned from the ant script output so I can view the results on the Outputs tab after execution. Add the following. If you want more results returned, you can do so.

- Now drag execute from FlexagonShellPlugin under Plugin Operations section.
- Drop it on the flow after Deploy SOA
- I am going to run ant using shell commands. There are other ways to do this, you can use WLST, Maven etc. Enter the below commands in These commands provides basic execution details. You can extend/customize based on your testing needs.
[feature_box style=”1″ only_advanced=”There%20are%20no%20title%20options%20for%20the%20choosen%20style” alignment=”center”]
#Variables needed to run ANT task. Getting from FlexDeploy Environment Instance variables.
SOA_HOME_VAR=${FD_INSTANCE_CODE}_FD_ORACLE_SOA_HOME
ADMIN_USER_VAR=${FD_INSTANCE_CODE}_FDWLS_ADMIN_USER
ADMIN_PASSWORD_VAR=${FD_INSTANCE_CODE}_FDWLS_ADMIN_PASSWORD
PROP_FILE=${FD_TEMP_DIR}/${FDSOA_PARTITION}_${FDSOA_COMPOSITE_NAME}_jndi.properties
SOA_HOST_VAR=${FD_INSTANCE_CODE}_FDSOA_SERVER_HOST
SOA_PORT_VAR=${FD_INSTANCE_CODE}_FDSOA_SERVER_PORT
#Create properties file as needed by ANT task
echo “java.naming.factory.initial=weblogic.jndi.WLInitialContextFactory” > ${PROP_FILE}
echo “java.naming.provider.url=t3://${!SOA_HOST_VAR}:${!SOA_PORT_VAR}/soa-infra” >> ${PROP_FILE}
echo “dedicated.connection=true” >> ${PROP_FILE}
echo “dedicated.rmicontext=true” >> ${PROP_FILE}
#Run ANT task
${!SOA_HOME_VAR}/../oracle_common/modules/org.apache.ant_1.9.2/bin/ant -f ${!SOA_HOME_VAR}/bin/ant-sca-test.xml -Dscatest.partition=${FDSOA_PARTITION} -Dscatest.input=${FDSOA_COMPOSITE_NAME} -Djava.naming.security.principal=${!ADMIN_USER_VAR} -Djava.naming.security.credentials=${!ADMIN_PASSWORD_VAR} -Djava.passed.home=${JAVA_HOME} -Dwl_home=${!SOA_HOME_VAR}/../wlserver -Djndi.properties.input=${PROP_FILE} -Dscatest.result=${FD_TEMP_DIR}
#Set outputs back to the workflow. Just grep and find values, if needed can use xpath function to get results.
setOutput TestCount `grep -Po ‘(?<=testCount=”)\w+(?=”)’ ${FD_TEMP_DIR}/antRun-TestFwk.xml`
setOutput TestPassCount `grep -Po ‘(?<=passCount=”)\w+(?=”)’ ${FD_TEMP_DIR}/antRun-TestFwk.xml`
setOutput TestResults `grep -Po ‘(?<=test:assertionOutcome outcome=”)\w+(?=”)’ ${FD_TEMP_DIR}/antRun-TestFwk.xml`
setOutput TestFailureCount `grep -Po ‘(?<=failureCount=”)\w+(?=”)’ ${FD_TEMP_DIR}/antRun-TestFwk.xml`
setOutput TestErrorCount `grep -Po ‘(?<=errorCount=”)\w+(?=”)’ ${FD_TEMP_DIR}/antRun-TestFwk.xml`
setOutput TestInProgressCount `grep -Po ‘(?<=inProgressCount=”)\w+(?=”)’ ${FD_TEMP_DIR}/antRun-TestFwk.xml`
[/feature_box]
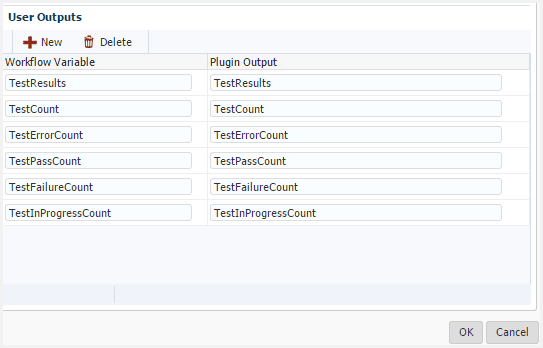
Click the User Input/Output tab on the Shell Plugin popup and create outputs mapping as below. This is needed to assign the output variables from Shell plugin to Workflow outputs. Once completed, click OK to close the popup window.
- Now activate the workflow by clicking on the Activate
- Optimally you can add IF condition to your Workflow to fail the Deploy step based on number of failures.
These Workflows are reusable for all SOA composites. If you have Test Cases defined in your composite, you will see test counts and outcome on the Outputs tab. Once you start adding the test cases to your composite, you will start seeing the test counts on the Output tab without changing anything in FlexDeploy. The best practice is to have test cases on day one and keep adding whenever you add new functionality to your composite .
