Dell Boomi AtomSphere is an integration platform as a service (iPaaS), for connecting cloud and on-premises applications and data. This enables customers to design cloud-based integration processes and transfer data between cloud and on-premises applications.
Today, we’ll look at the steps involved in deploying a process/packaged component to a Boomi environment. We’ll start from the beginning and show the configuration of the build and deploy workflows, topology, and the Boomi project. This is a one-time setup, and a lot of it can be used to integrate other technologies with FlexDeploy.
FlexDeploy Dell Boomi Plugin
FlexDeploy, via the Dell Boomi plugin, provides out-of-the-box integration with the AtomSphere platform to deploy processes, either directly or as part of a versioned packaged component. The plugin also provides operations to undeploy an actively running process and manage the state of listeners configured in a process.
Build and Deploy Workflows
Operations from the FlexDeploy Dell Boomi plugin can be used in a workflow to perform build and deployments. The build workflow contains steps to retrieve details of a packaged component from the AtomSphere platform. The build artifact is then used during deployment execution to publish a packaged component to a target environment.
The build workflow uses the buildComponent operation from the Boomi plugin.

The deploy workflow uses the deployComponent operation from the Boomi plugin.

The notes for the deployment can be set in the deployComponent operation configuration screen.
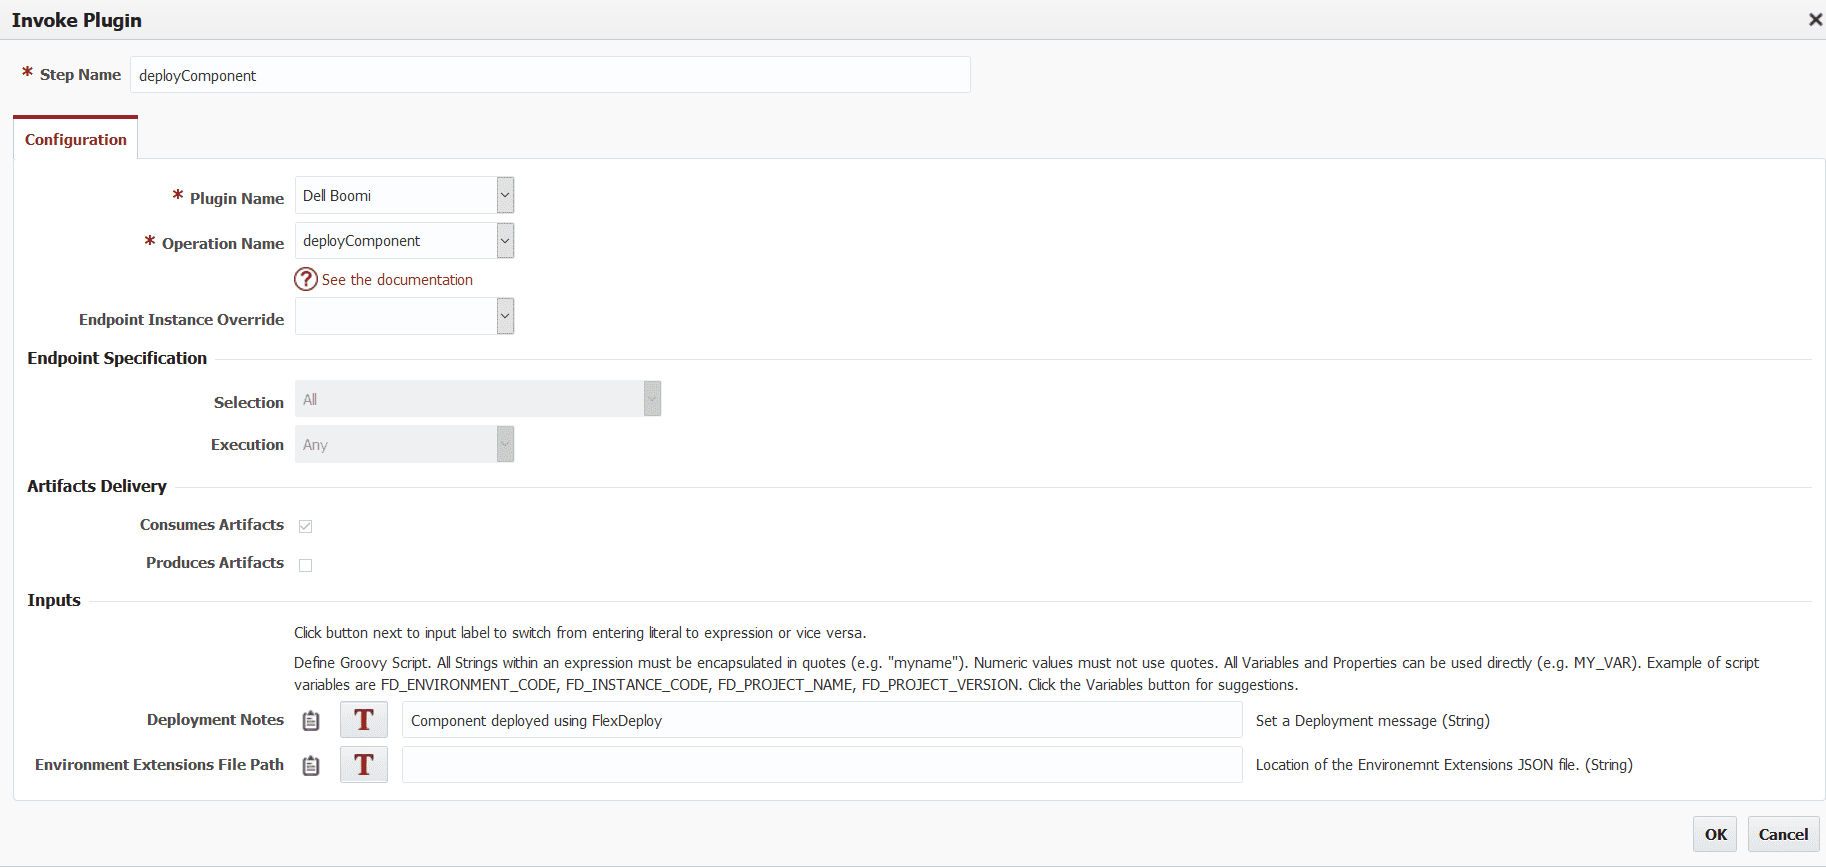
Notice that no scripting is required, and we simply drag and drop the out-of-the-box plugin operations to create reusable workflows.
Dell Boomi Cloud Account
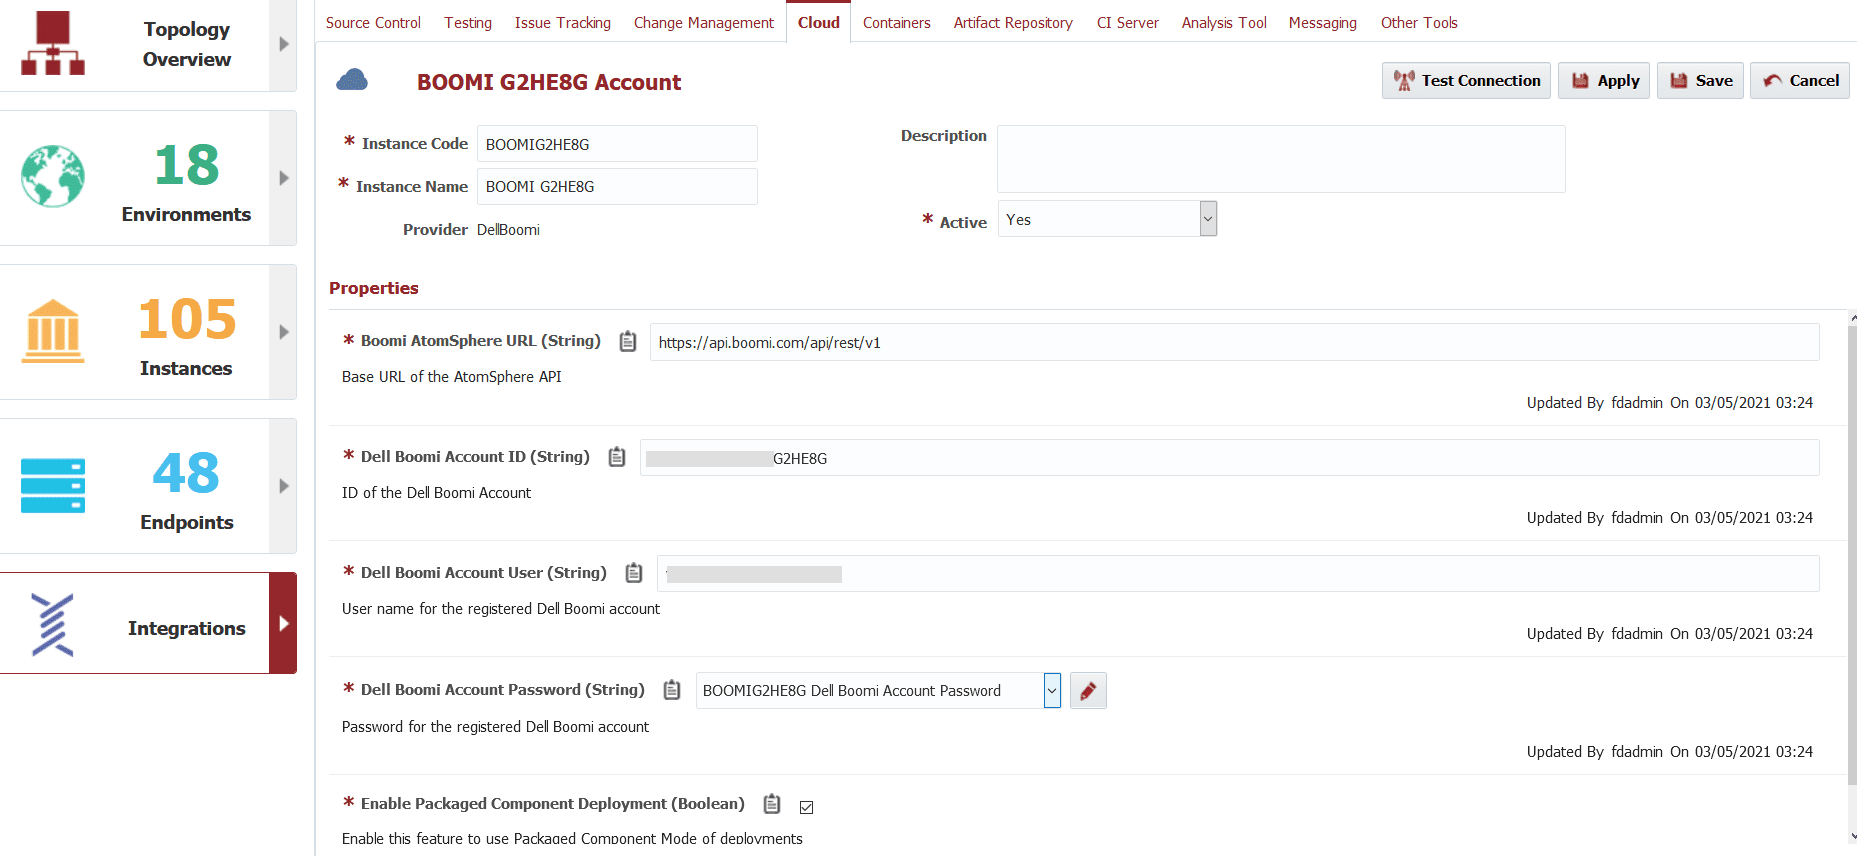
A connection to the AtomSphere platform is established by creating a cloud account and providing the URL and credentials, and will be used by the plugin as part of its build and deployment operations.
Topology Configuration
Now that we have our workflows and cloud account configured, our next step is to configure our topology. The environments and instances will be configured.
Instances
Create an instance named Boomi. Next, go to the environments tab for the newly created instance and associate the relevant environments by dragging them from right to left.

Then, proceed to the Workflows tab and associate the workflows we created.

Environment Instance
Once our instance is set up, we can go to the Topology Overview tab to configure our Environment Instance information. Here, we will set the AtomSphere platform account and the Environment ID for the corresponding environment.

There is no need to create a new Endpoint as all the invocations are performed remotely from FlexDeploy. We can simply use the out-of-the-box LOCALHOST endpoint, which is the FlexDeploy server.
Creating the Project
Now we will tie together the configurations performed in the earlier steps by creating our Boomi project (one for each AtomSphere process).
Once the project is created, go to the configuration tab, set the SCM Type to None, and select the Build and Deploy workflows and the Build and Deploy instances. Once these steps are complete, our project configuration screen will look something like this:
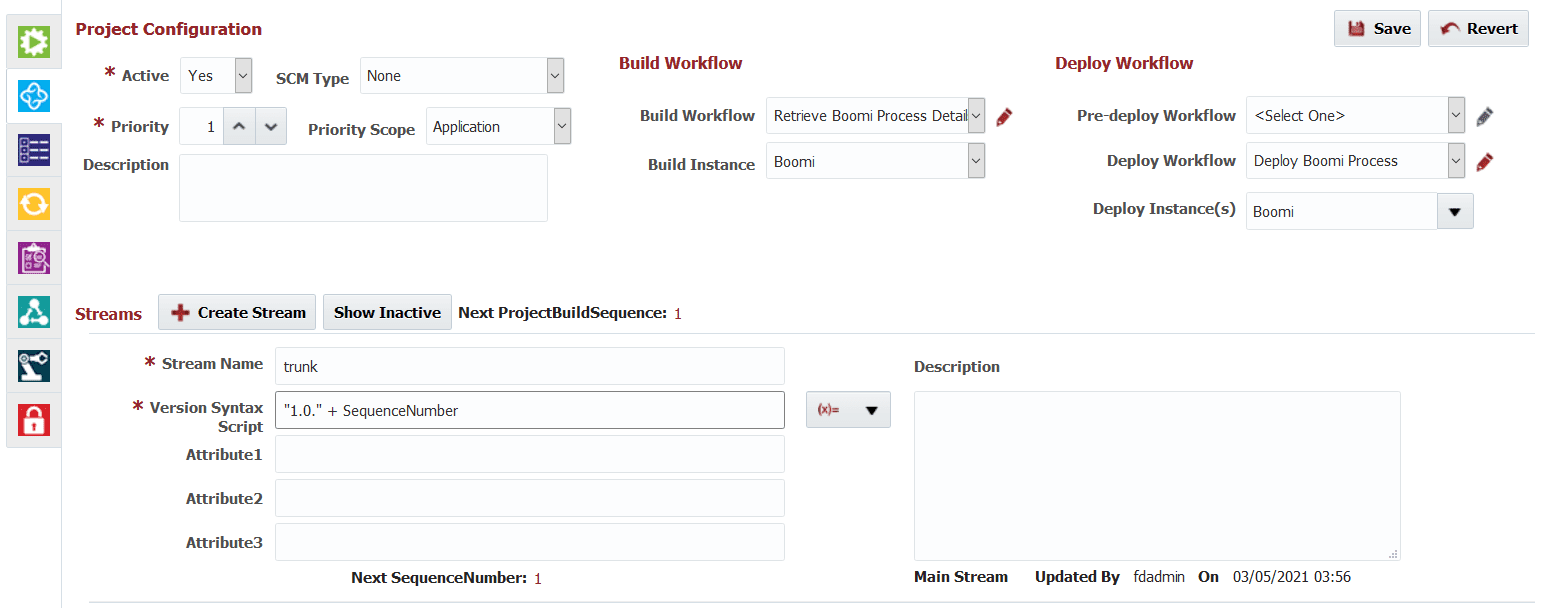
Next, we will provide the ID of the process/packaged component to be deployed in the Project Properties tab. The plugin can identify at runtime, whether the given ID is for a process directly or for a packaged component.

We can proceed to the execution of the Build and Deploy operations configured. The details of the process/packaged component configured are retrieved and stored as a JSON artifact file. The details contained in this file will be used during deployment execution to deploy the process to the target environment.
Here’s a sample of what the artifact generated looks like.
{
  "componentType":"process",
  "componentId":"4f4673c4-0ff3-4571-b87e-a8309cb39c38",
  "notes":"Component deployed using FlexDeploy",
  "@type":"DeployedPackage",
  "packageId":"3af94252-d08a-4ef6-913c-f90e7730a9ba",
  "active":true,
  "packageVersion":"1.2",
  "deployedBy":"[email protected]",
  "componentVersion":2,
  "version":3,
  "environmentId":"b7593625-47df-4115-9fe1-ab3347a02e7b",
  "deploymentId":"55a0b0df-64d0-486b-8da0-4ae43dd9db54",
  "deployedDate":"2021-03-05T10:03:25Z"
}
Here is a view of the build and deploy execution activity.
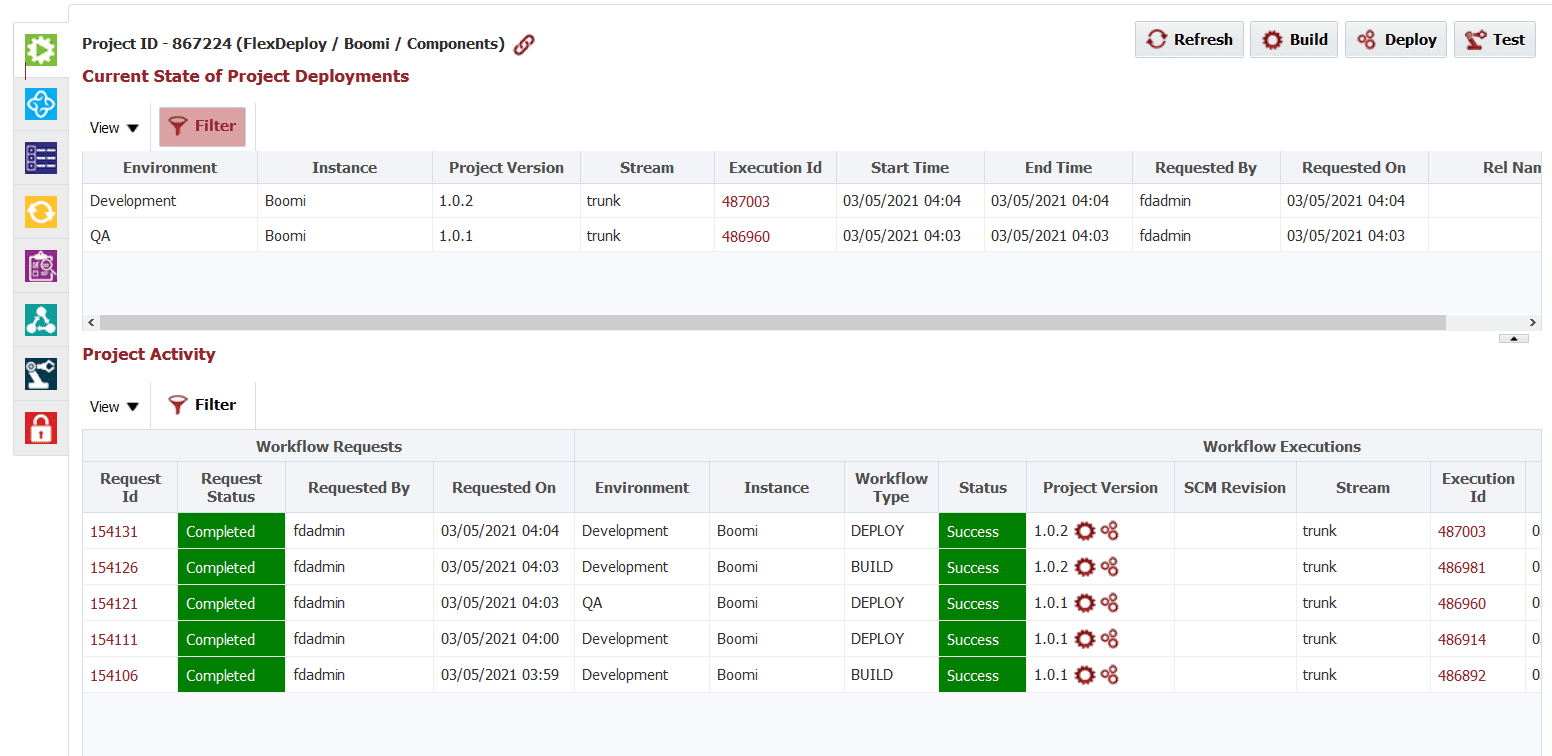
The Execution ID for each operation can be clicked on to view more comprehensive logs.

We now have our Boomi project configured with Build and Deploy workflows. With this approach, you can take advantage of agile approaches to improve the speed and quality of your AtomSphere platform deployments to various environments. You can also leverage FlexDeploy platform features such as release/pipeline orchestration, scheduling, approvals, and reporting to achieve CI/CD at scale.
Integration doesn’t stop at Dell Boomi, FlexDeploy has out-of-the-box solutions for over 100 commercial and open source tools and technologies. Continue exploring.

