
FlexDeploy now offers a simple-to-use plugin for IBM WebSphere Application Servers, and it’s the easiest way to manage deployments to your WebSphere environment.
What We’ll Do
- Look at the operations on the WebSphere plugin
- Create a project for our WebSphere application
- Create a workflow that deploys an EAR file to a WebSphere Application Server
The Operations
First things first, let’s take a look at what operations the WebSphere plugin has now. To view more details about the plugin and it’s operations, check out the plugin guide here: Flexagon WebSphere Plugin Guide.
- Start and Stop Server
- These operations will start or stop WebSphere servers. The plugin will automatically determine if it’s running on a Network Deploy or WAS Base environment and use the appropriate method to control the server.
- One or more servers can be managed with one workflow step, so the workflow remains simple, even if you’re starting dozens of servers.
- Deploy
- For deployment, there is a Project Property called Server or Cluster Name that holds the name of a server or cluster to deploy the application to.
- This operation will look for an artifact automatically in the FlexDeploy Artifact Repository to deploy based on the Application Name project property.
- This operation allows users to select the resource type of the endpoint it will run on. There are 3 WebSphere resource types, WAS Deployment Manager, WAS Node Agent, and WAS Managed Server.
- Undeploy
- This operation will uninstall an application from the WebSphere server.
- This operation only needs to know the name of the application to remove, as the Deployment Manager knows the server where the application is deployed.
- This operation allows users to select the resource type of the endpoint it will run on.
- Start and Stop Application
- These operations will start or stop an application running on the WebSphere server.
- These operations only require the Application Name
- Execute Script and Execute Script File
- These operations allow you to execute a script for wsadmin using a file or list of commands.
The Workflow
Now that we have an understanding of the operations in this plugin and the environment is setup (more about environment configuration: FlexDeploy Getting Started Guide) we can start to create a workflow that will deploy an artifact to a WebSphere Application Server. I’m not going to detail the build process in this blog, for simplicity’s sake.
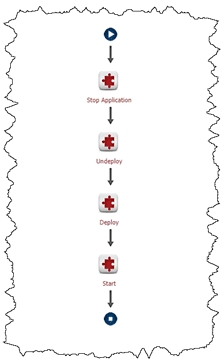
In this workflow, we’ll need to stop the application, undeploy the application, deploy the new version, and then start the application. To do this, we’ll use the Stop Application, Start Application, Deploy, and Undeploy operations of the WebSphere plugin.
Create a new workflow in FlexDeploy, give it a name, group, and subgroup. Choose “Deploy” for the Workflow Type, click Save and then click onto to the Workflow Definition tab.
- From the Plugin Operations panel in the lower right corner of the screen, either search or scroll through the plugins to find the IBM WebSphere plugin. Expand the list and drag the stop application operation onto the canvas.
- The next thing we want to do is undeploy the application, so it can be replaced with a new version. To do this, we’ll drag the undeploy operation onto the canvas. On this operation, we need to choose a resource type from the Endpoint Selection menu. From the Endpoint Selection dropdown, choose the type of resource that represents the software on the endpoint this will execute on. In a WAS Base Environment, leave this set to All.
- Once the application is undeployed, we’ll be ready to deploy the new artifact. The next step will be the deploy operation, drag the operation onto the canvas. On this operation, we choose the resource type again, the same way as in the undeploy step. In a WAS Base Environment, leave this set to All.
- Lastly, we want to start the application after deployment, so we drag the start application operation onto the canvas.
With that done, here’s what the workflow should look like:
With the workflow created, it’s time to set up the project within FlexDeploy.
The Project
In this section, we will configure a project to build and deploy an application to a WebSphere Server.
First, we need to create a new project by right-clicking an application in project explorer on the Projects screen and choosing Create Project. It’s recommended to set the project name to the name of the application it will deploy. This helps to keep the FlexDeploy project explorer consistent with the names on the server, as well as preventing some configuration mistakes. Once the project is created, we need to configure it. For this we’ll be using two of the configuration screens.
The Project Configuration Screen
The second tab from the top on the project page is for Project Configuration. Here we will specify the workflows, instances, and SCM properties for the project. Here is an example of what it might look like:
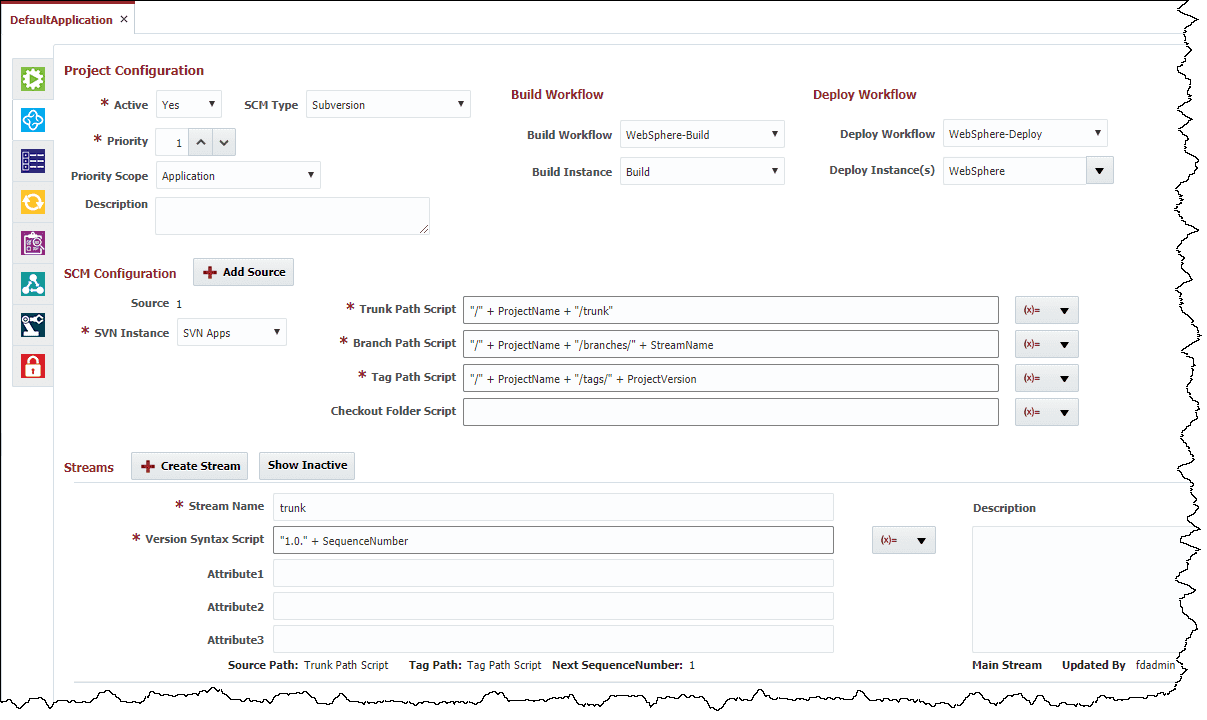
Make sure to save, then continue to the Project Properties screen by clicking on the icon directly below the Project Configuration tab.
The Project Properties Screen
This screen is where we will define the properties required by the plugin.
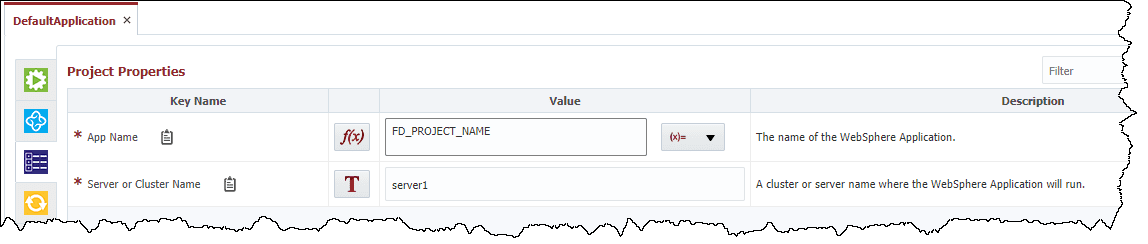
- App Name is the name of the application this project will deploy. I recommend giving the project the same name as the app running on the server, so we can set this to FD_PROJECT_NAME. (Make sure to change the input to f(x) instead of text, this will switch the text box to a groovy script)
- Server or Cluster Name is just that, the name of the server or cluster to deploy to. My environment has a server called server1.
Project Execution
Build
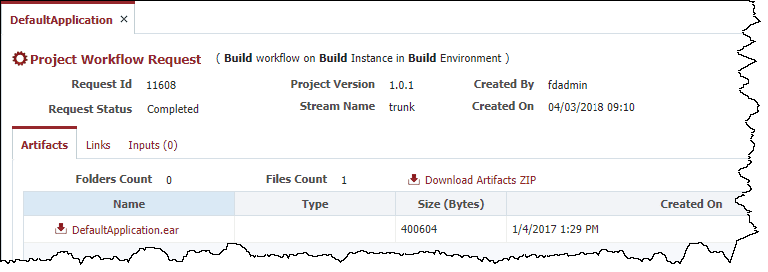
Now that the project is configured, we’re ready to build it. All we must do is click Build, then wait for the build to complete. Once the build finishes, there will be an artifact in the Artifact Repository. We can check this by clicking the request id of the completed build and selecting the Artifacts tab at the top of the page.
Deployment
Now that the build has completed and produced an artifact, we’re ready to use our workflow to deploy it to a WebSphere server. To start the process, all we have to do is click Deploy. On the deployment request form, choose the environment to deploy to, then click okay. The deployment will start, and clicking the execution id will show the status of the workflow execution, as well as links to view logs for the individual plugin operations.
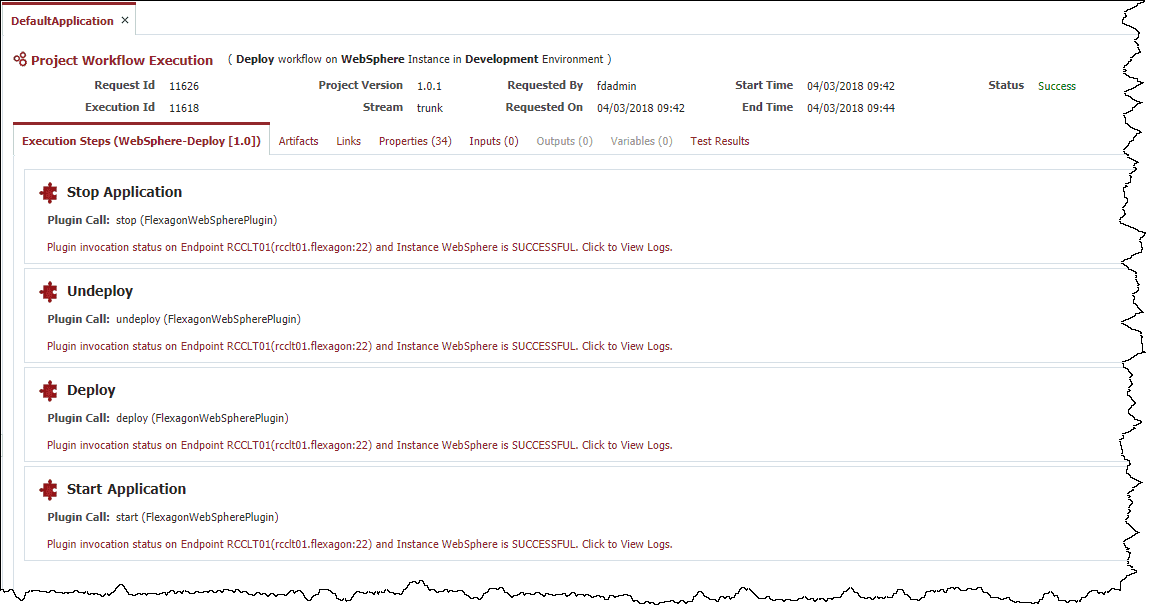
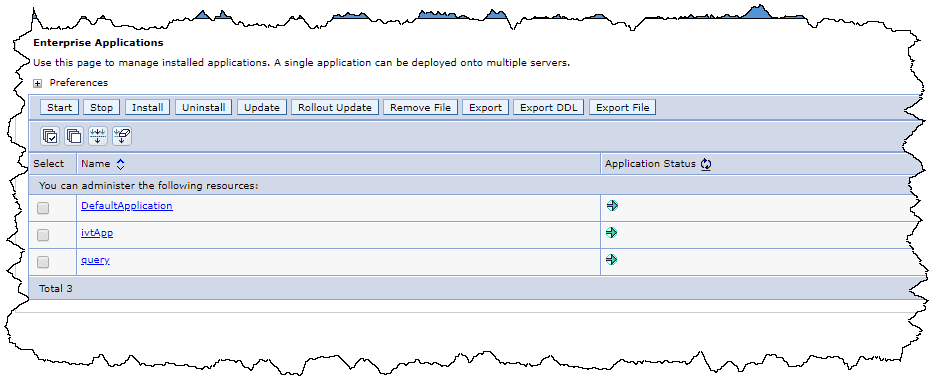
Once the deployment is finished, we can go to our WebSphere server, and see the application is deployed. Now all we have to do is browse to the WebSphere Admin Console in a web browser, and we’ll be able to see the application running.
In Conclusion
The WebSphere plugin for FlexDeploy is a great tool for those looking to simplify their deployment process to WebSphere servers. The flexibility of the plugin makes it an easy solution for any environment, and the repeatable process eliminates the chance of human error causing problems with the deployment. FlexDeploy offers dozens of other plugins and tools that can be used in conjunction with the WebSphere plugin to make the development process even easier, not to mention quicker. Whether you’re a small company with a few servers, or a large enterprise with hundreds of servers, it’s hard to deny that the WebSphere Plugin for FlexDeploy is one of the easiest ways to manage your IBM WebSphere environments.