Enterprises adopt one of two different approaches for Salesforce development: Org-based development or Source-control based development. With Org-based development, you make all the changes in your Sandbox/development Org or Scratch Org. In the Source control-based development model, you will have changes developed in your favorite IDE and commit the changes to a source control system like GIT. Or you can adopt a hybrid approach combining both.
With FlexDeploy, you can quickly release your changes in any approach you chose, while ensuring high quality. In this blog article, I will explain how to configure FlexDeploy and then execute your Salesforce code migrations.
Configuration
Configuration is a one-time setup in FlexDeploy to start building, deploying, and releasing Salesforce changes. FlexDeploy has a very useful blueprints feature to help set up any technology quickly and easily. We will use these blueprints to configure our Org-based Salesforce deployments.
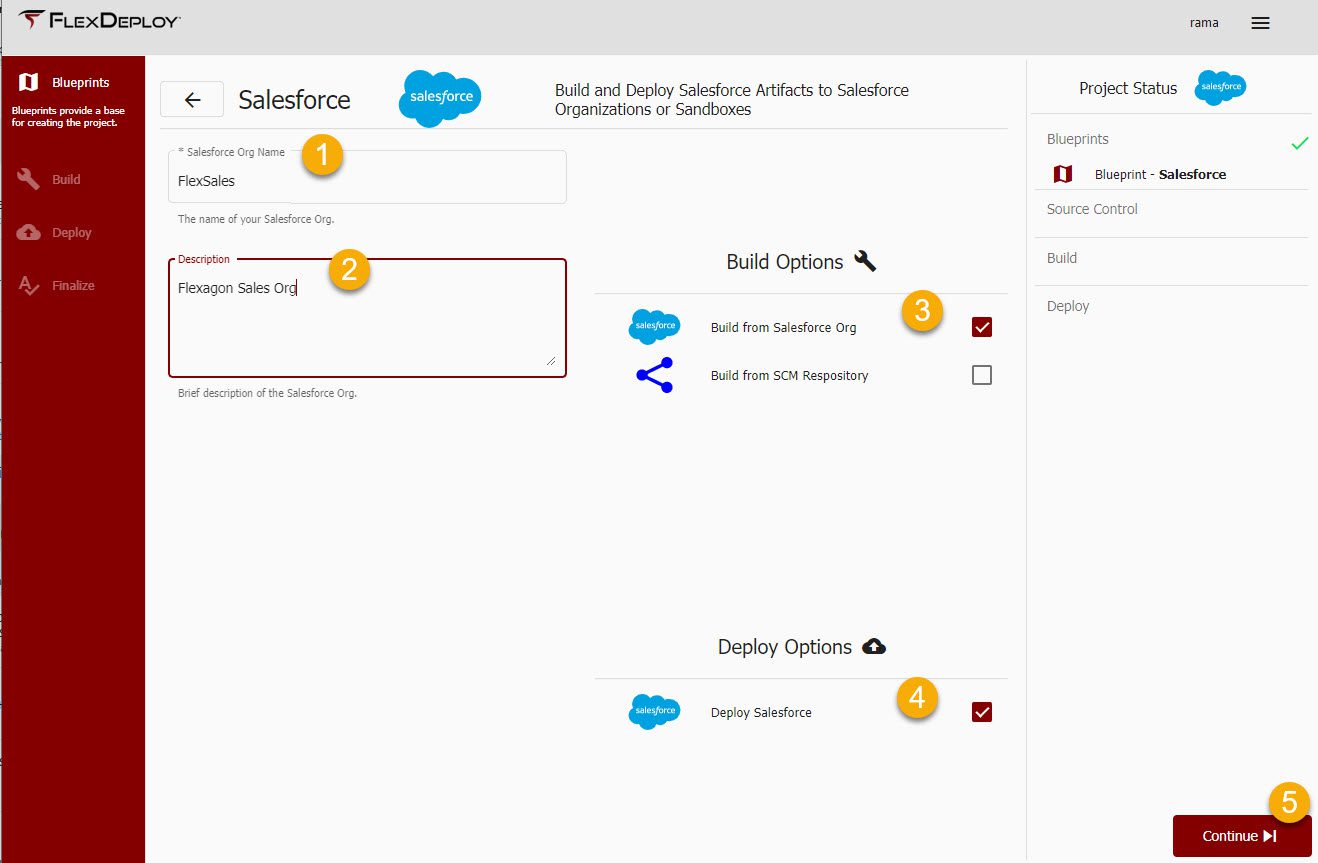
Once you log in to FlexDeploy, launch Blueprints by clicking on the map icon in the top right corner. You will be lead through a 4-step configuration of your project in FlexDeploy to configure DevOps for Salesforce. Locate the “Salesforce” tile and click on it to get started. Once you’ve selected Salesforce, simply follow the screens and enter details as below.
- First, enter the Salesforce Org name (this is normally your company name or application name if you have multiple Salesforce Orgs) and then enter a description. Leave the defaults under Build Option as Building from Salesforce Org and the Deploy Option checkboxes as selected.

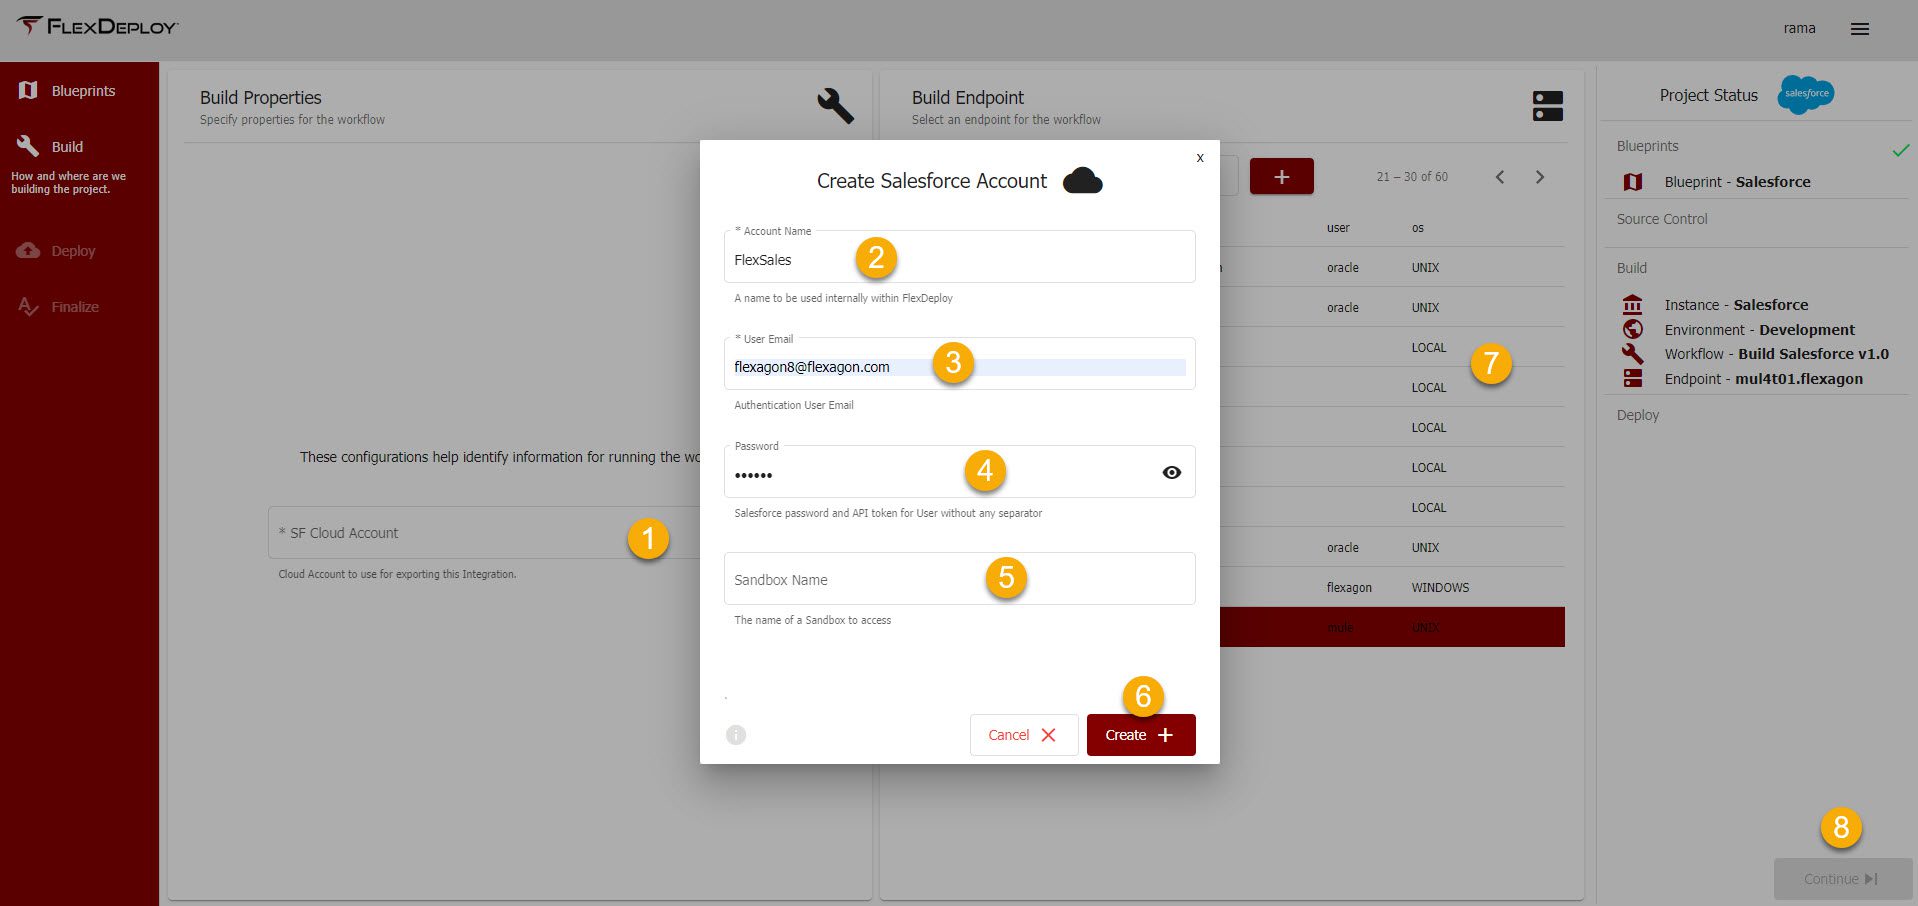
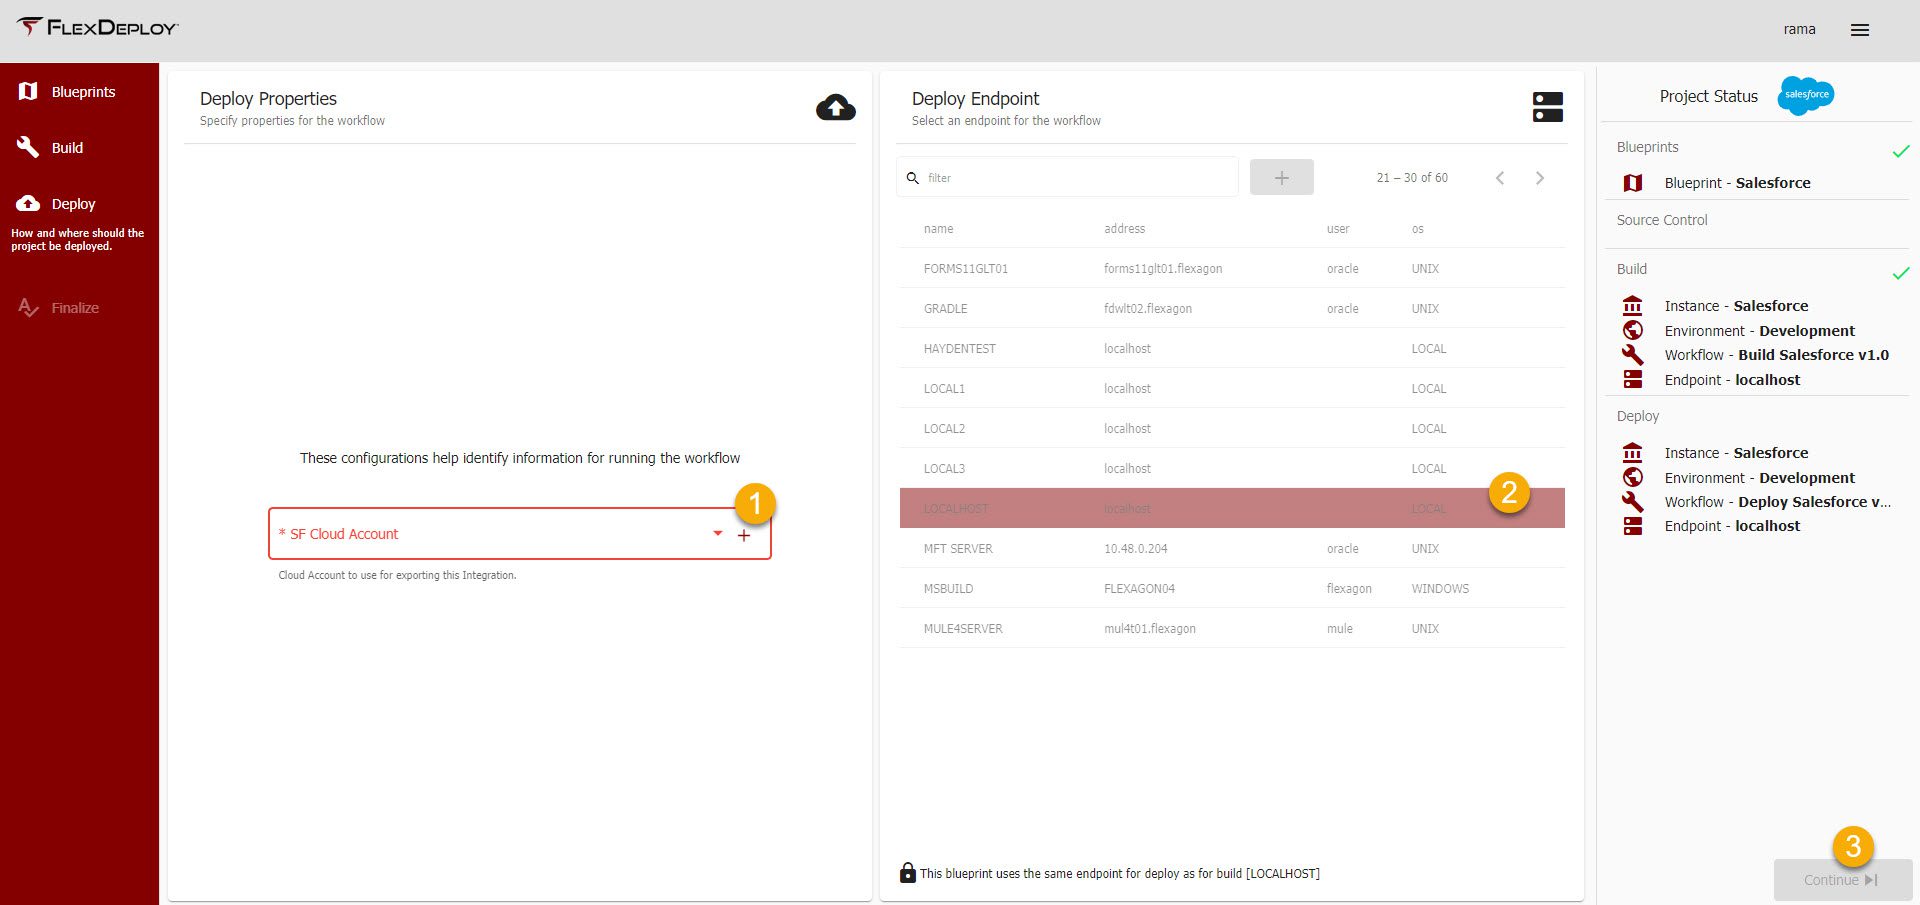
- On the Build screen, click on the + icon to add the Salesforce connection details for your development org or the Sandbox where you develop changes. FlexDeploy supports basic auth or OAuth. Enter the required details on the screen and then you choose if you will use basic auth or OAuth. Select Localhost for the Build Endpoint and click Continue.

- On the Deploy screen, enter the details for you target Salesforce Org. You can enter multiple, as you will have more target Salesforce Orgs to deploy. Select Localhost as the Deploy Endpoint and click continue.

- On the Finalize screen, review all the information entered and click Create.

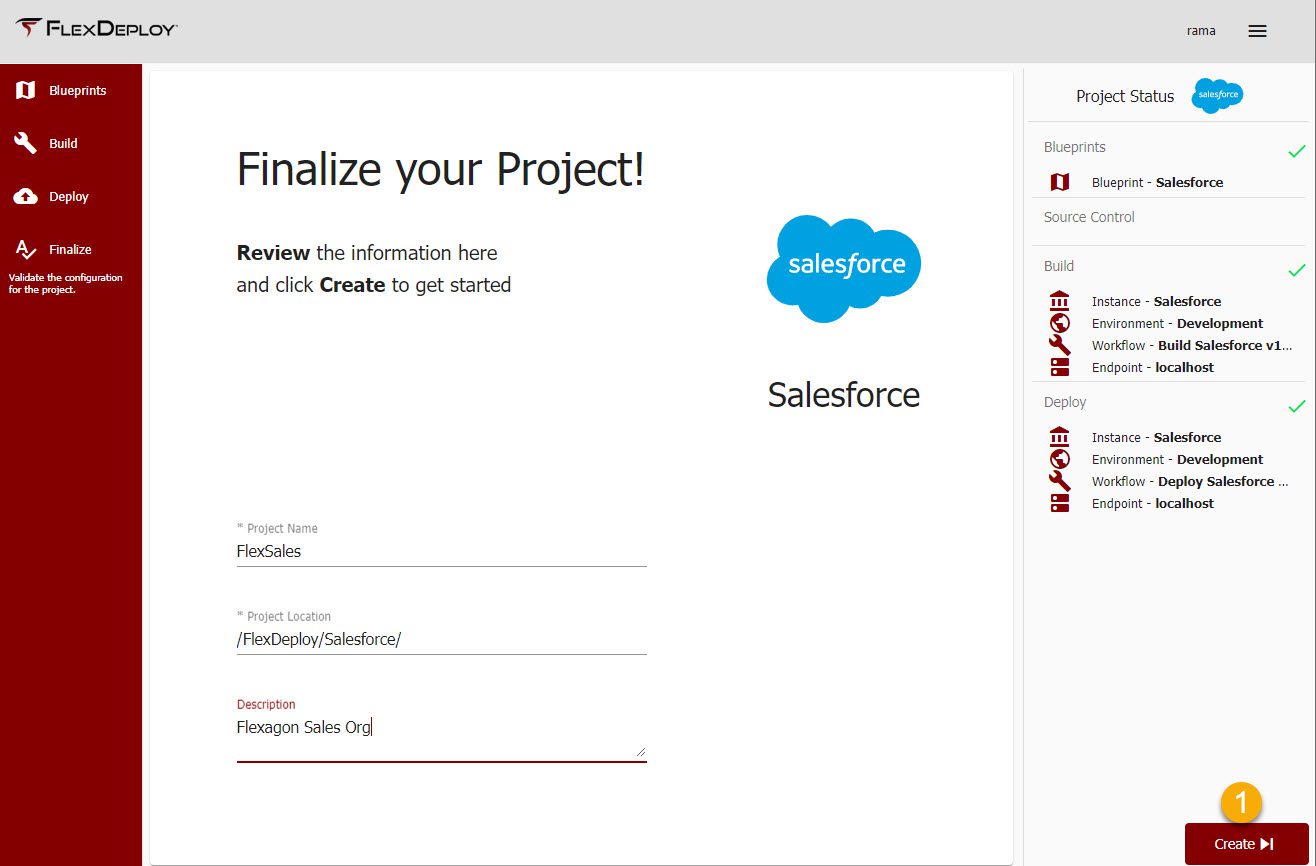
That’s it. you are done with configuring your Salesforce project in FlexDeploy. Now you can start building and deploying your Salesforce changes.
Review Configuration
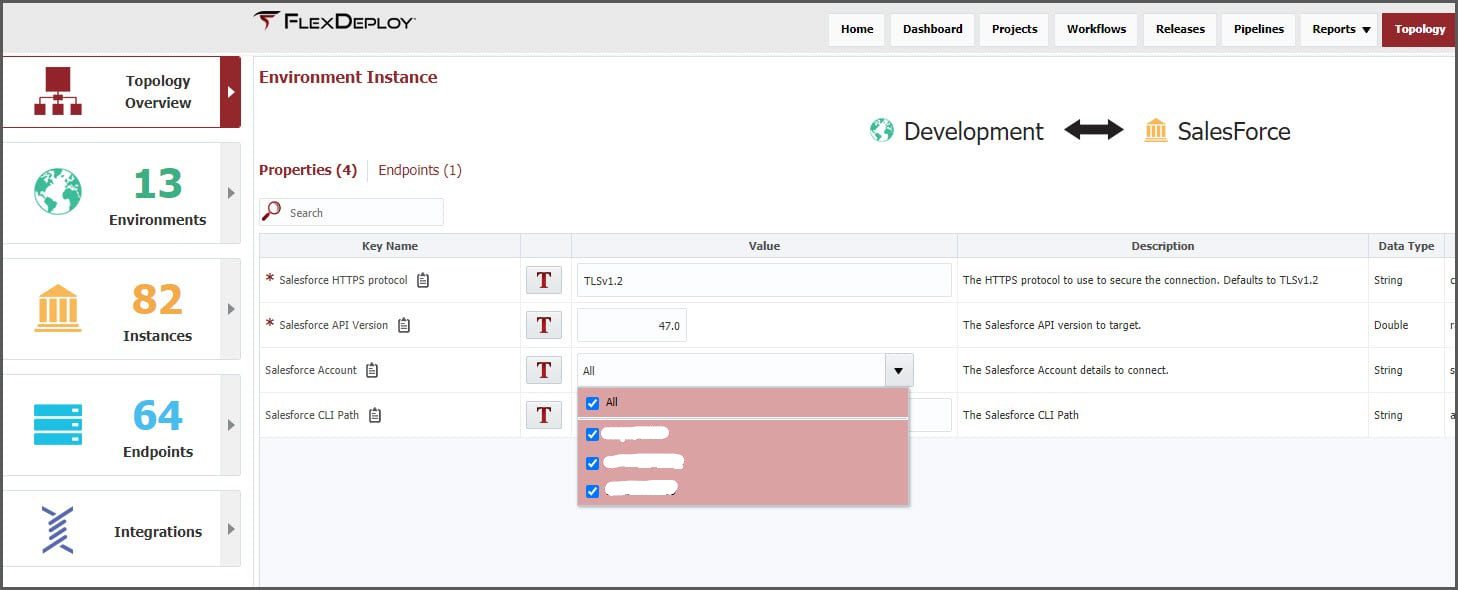
Click on Open Project to start working on your changes. Once you open the project, you can review the settings created in the blueprint like project configuration, workflows, and topology information. If you want to add more Salesforce Orgs, you can add them from Topology -> Integrations -> Cloud accounts and then associate them to the correct environment in Topology Overview.
FlexDeploy supports multiple Sandboxes in an environment, allowing you to deploy changes to multiple Orgs in an environment with one deployment. Hence all the different Salesforce Orgs are in sync.
Execution
Once you complete the development of the changes in your Salesforce development Sandbox, Open the FlexDeploy project. On the project screen, you will discover the changes, create a package with selected files that are ready to move to other organizations, and then deploy the changes to other Salesforce environments. Optionally, you can configure PMD analysis, Apex class testing, and automation testing.
Now we will check how to do the execution manually, and then you can configure CI for Salesforce to automate the complete process and increase productivity.
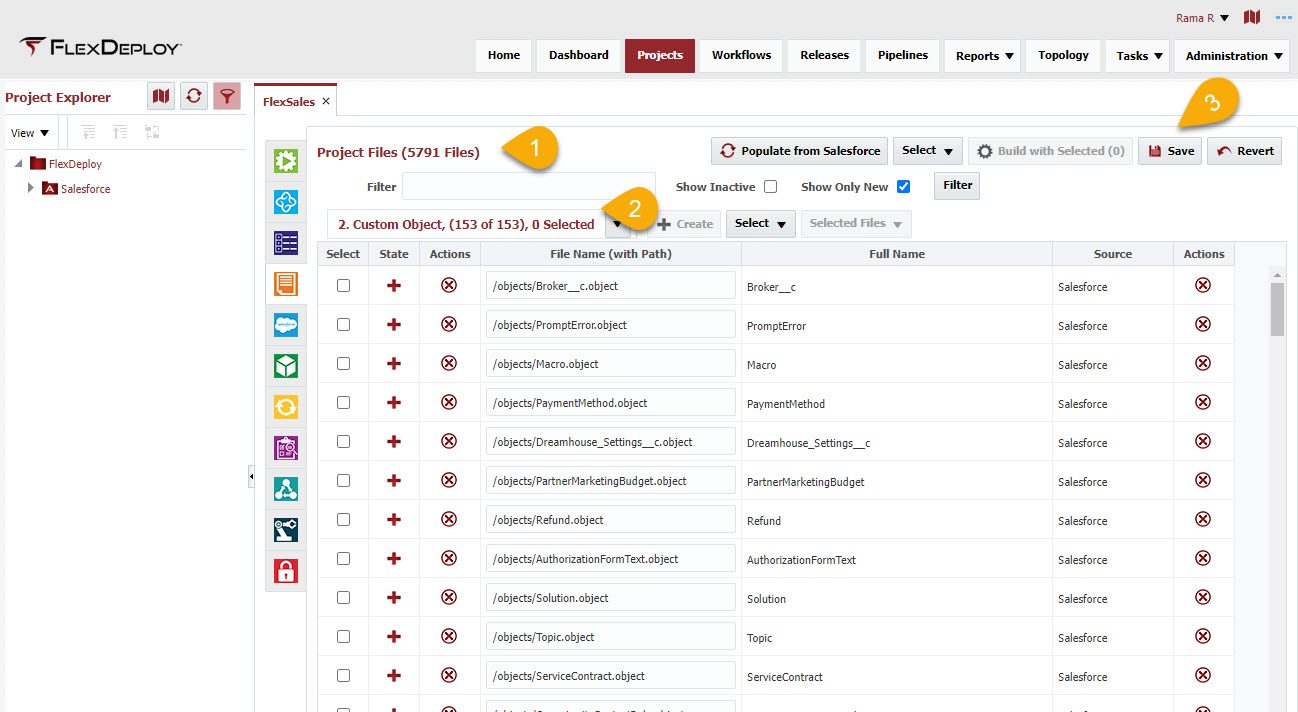
1. Discover Changes
Click on the Files tab after opening the Salesforce project. On this tab, you can discover files from Salesforce and manage files by activating or inactivating any that you don’t want to deploy to other environments.
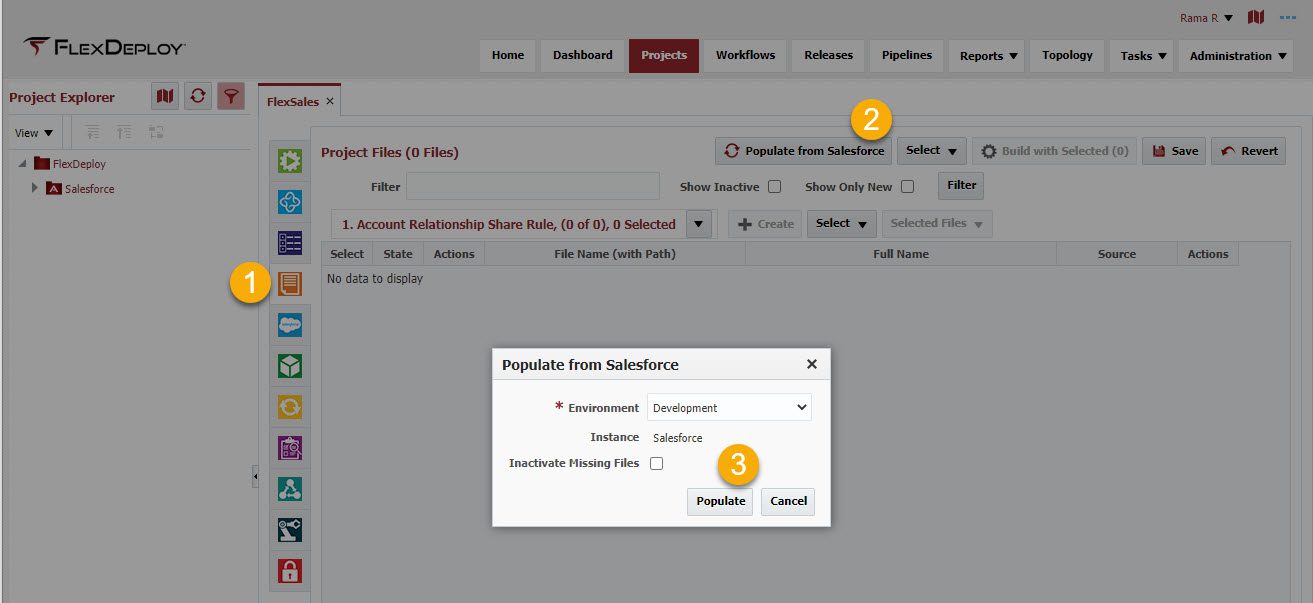
Once you click on Populate, FlexDeploy will connect to Salesforce Development Org / Sandbox and discover all the files that can be deployed. This step will take a few minutes based on how many changes you have in your Salesforce Org.
Once the files are populated, save them to store the metadata in FlexDeploy. This discovery step can be done in the background via CI without any manual intervention when you configure the CI trigger.
To enable CI for Salesforce changes, follow the steps outlined in our blog outlining CI/CD for Salesforce.
2. Create Package
Now, let’s open the Package tab to create packages. Click on the + Create button and start entering the package name. Then click on the Add Files button to add files for your package. You can use a filter to locate your files.
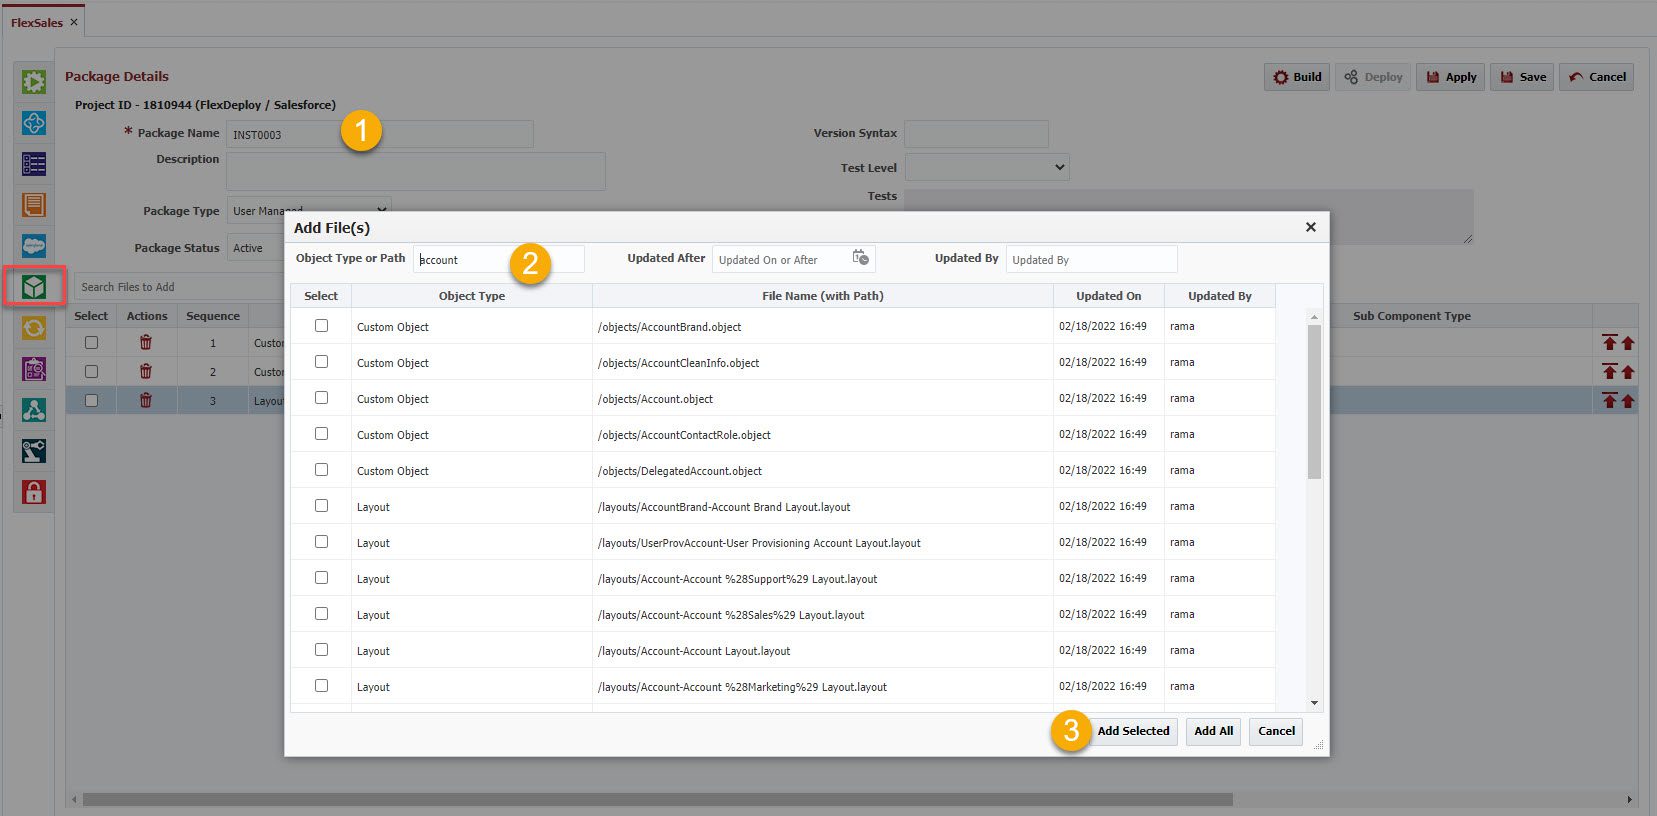
Once you select all the files to add, you can save the package. If you would like to include only partial file sections of a big object, you can use the Subcomponents button to add only the desired section of the file into your package. Read more about the Subcomponents feature here.
3. Deploy Changes
Your package is ready to deploy to your target Salesforce Org. You have multiple options to deploy the changes. You can use project deployment for your packages, or release management and pipelines with quality-ensuring gates to deploy your Salesforce changes in a continuous manner.
For quick package deployment, click on the Build button first to create a package artifact with selected files. Once the build is completed, click on the Deploy to submit the deployment to the desired environment.
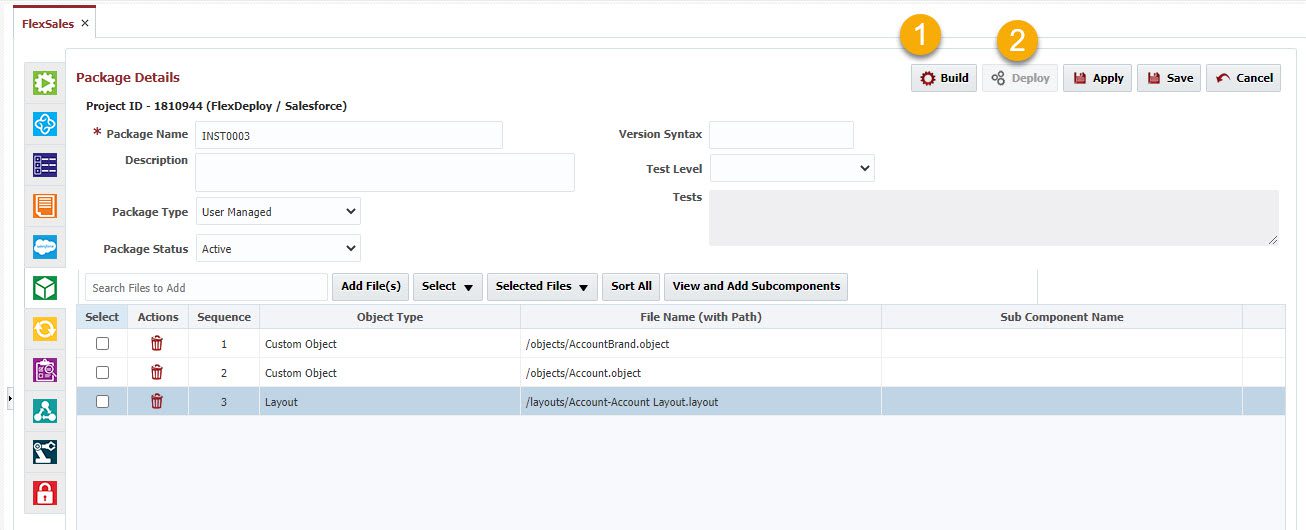
Once the deployment is successful, you can verify the deployed change in Salesforce. You can configure an Apex test on the Package screen, and add validation using pre-deploy, if needed.
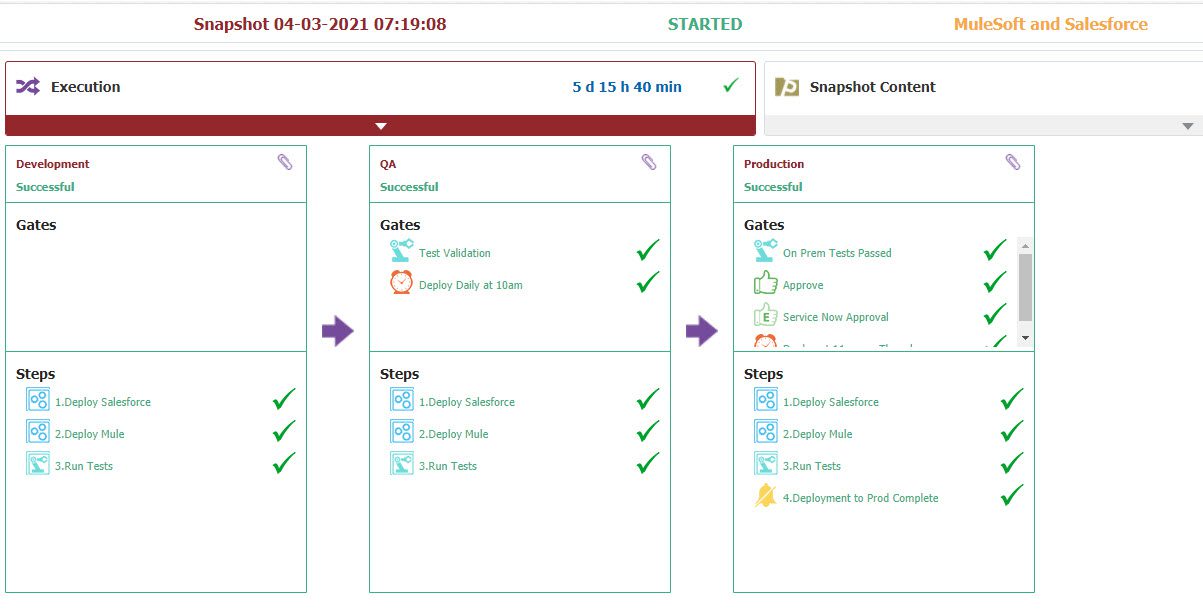
In most cases, you’ll want to deploy your changes using the release management as shown below from one environment to another. You can create pipelines and configure the release with quality gates, approvals, schedules, and visibility.
Conclusion
FlexDeploy makes it very easy to Deploy your Salesforce changes using DevOps best practices. Though you may configure to deploy Org to Org, FlexDeploy gives you many features like versioning the artifacts for easy rollback. FlexDeploy enables full integration with all major source control systems, and can easily be configured to your Salesforce projects. You can simply add a step in your workflow to add the files to the Source control system and commit.
With FlexDeploy, you can achieve high-quality DevOps with your Salesforce application.
Want to get started with FlexDeploy for Salesforce? Schedule a demo today!