
Salesforce Configure, Price, Quote (CPQ) is a powerful tool for managing complex pricing and quoting processes. However, deploying CPQ configurations and data from one Salesforce environment to another can be a challenging task. Are you looking for an efficient and streamlined way to handle Salesforce CPQ data deployments? Look no further!
Key Benefits of Using FlexDeploy for CPQ Data Deployment
FlexDeploy can simplify and enhance the data deployment process for CPQ, offering you greater control and flexibility while saving you valuable time and effort. There are some key benefits to using FlexDeploy for Salesforce CPQ data deployments.
- Seamless Data Deployment for CPQ Objects
FlexDeploy simplifies the process of deploying CPQ data by accommodating both Cross-Reference and Self-Reference CPQ objects. Whether you need to migrate complex configuration rules, pricing data, product bundles, or custom CPQ objects, FlexDeploy can handle it all. - Bundling Multiple Data Files into a Single Package
One of the standout features of FlexDeploy is its ability to bundle numerous data files (objects) into a single package. This feature enables the migration of data from multiple, distinct objects in one go. Gone are the days of deploying CPQ data object by object; now, you can package them together for more efficient deployments. - Precise Control Over Deployment Order
FlexDeploy offers the flexibility to establish a specific sequence for deploying CPQ objects’ data. This ensures that your data is deployed in the correct order, preventing dependencies and related records from breaking during the deployment process. You have precise control over how your CPQ data is migrated. - Creating Sets of Data File Types (Templates)
To further enhance your CPQ data migration process, FlexDeploy allows you to create sets of Data File Types, often referred to as templates. These templates enable you to migrate data as a group, preserving and maintaining the hierarchical (parent-child) relationships between records. This is especially valuable when dealing with complex CPQ data structures.
Prerequisites
Before starting the CPQ deployment process, create a deployment plan. Define a clear plan that outlines what CPQ components and data need to be migrated. This plan should include:
- Object Selection: Identify the CPQ objects you need to deploy, such as products, price books, product rules, and quote templates.
- Dependencies: Determine any dependencies between CPQ components and objects to ensure the correct order of deployment.
- Data Migration: Decide whether you need to migrate CPQ data along with configurations.
Prior to commencing the process, it is imperative to have a basic understanding of Salesforce CPQ Objects, their relationships, object dependencies, external IDs, security settings, and related factors to facilitate a successful deployment.
Use Case: CPQ Products and Pricing Data Deployment
Let’s dive into a practical use case to illustrate how FlexDeploy can be used for CPQ data deployment. In this example, we’ll consider migrating CPQ products and pricing data from a sandbox environment to a production org.
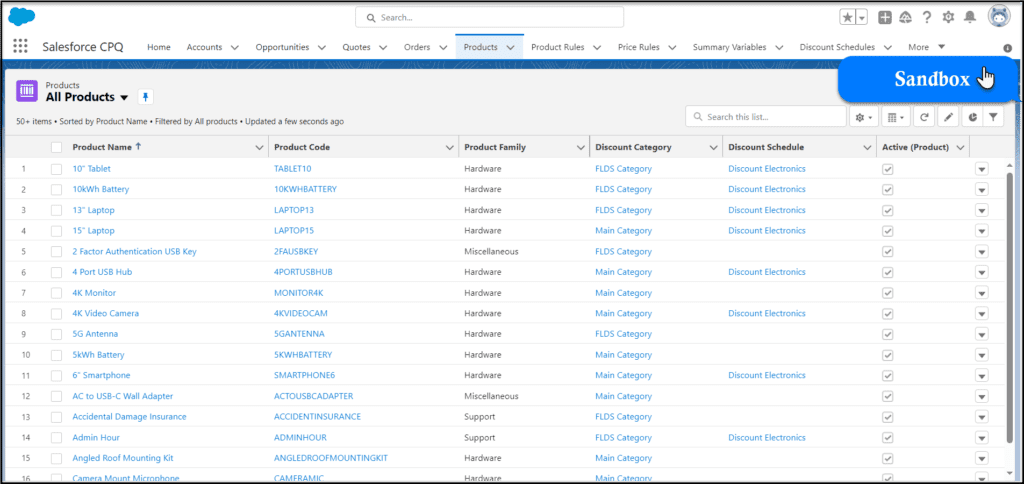
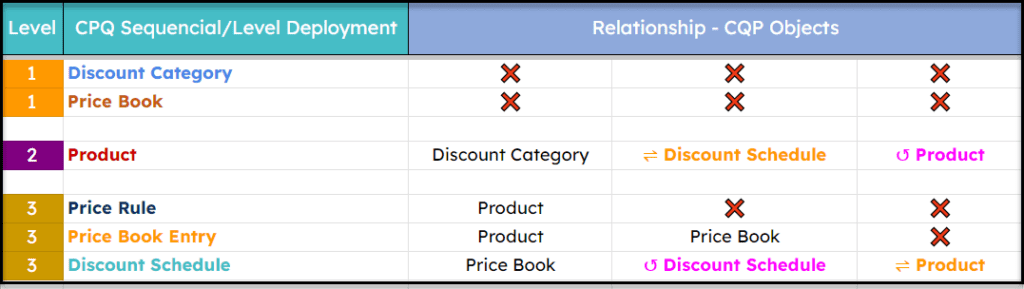
In this case, we’ll focus on the key objects and data related to these aspects of Salesforce CPQ. Here’s a list of objects to consider for your CPQ products and pricing data migration:
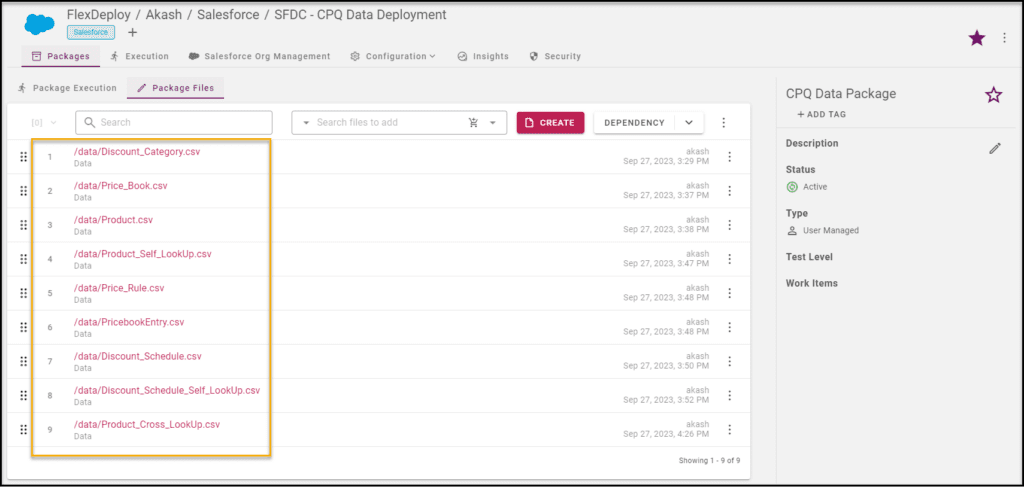
- Discount Category (SBQQ__DiscountCategory__c)
- Product (Product2)
- Price Book (Pricebook2)
- Price Book Entry (PricebookEntry)
- Price Rule (SBQQ__PriceRule__c)
- Discount Schedule (SBQQ__DiscountSchedule__c)
Step-by-Step Implementation:
Step 1: Set Up Your FlexDeploy Environment
Before you begin, ensure that you have a FlexDeploy environment configured with the necessary connections to your Salesforce source and target orgs.
The Project Setup in FlexDeploy is the same for code and data deployments. Create a new project for Salesforce or use an existing Salesforce project to start migrating your Salesforce CPQ data. Review our Salesforce Tutorial if you did not create a Salesforce project to start with.
Step 2: Categorize the Objects into Levels
Identify the top-level objects and categorize the remaining objects into different levels. The top-level objects are essentially those entities that have no dependencies on any other objects; they stand independently within the system. e.g., Price Book, Discount Category, etc. Objects dependent on top-level entities will be categorized as second-level objects, and this categorization continues down the hierarchy as necessary.
Step 3: Identify the External IDs
In Salesforce data deployment from one org to another, identifying and using External IDs is a crucial step to ensure a smooth and accurate data migration. External IDs are unique identifiers that you can assign to records in Salesforce objects. They serve as a bridge between records in different Salesforce orgs, making it possible to match and update records accurately during the data deployment process.
Steps to Identify External IDs:
- Identify Key Fields: Identify the fields in your Salesforce objects that can serve as External IDs. These fields should be unique and permanent identifiers for the records. Common examples include Account IDs, Product Codes, or Custom External IDs.
- Check for Existing External IDs: In some cases, your Salesforce objects may already have External IDs defined. Check for any existing External IDs and evaluate whether they are suitable for your migration needs.
- Create Custom External IDs (if necessary): If your Salesforce objects don’t have suitable fields for External IDs, you can create custom fields to serve this purpose. Ensure that these fields are text, unique and meet the requirements of your data migration.
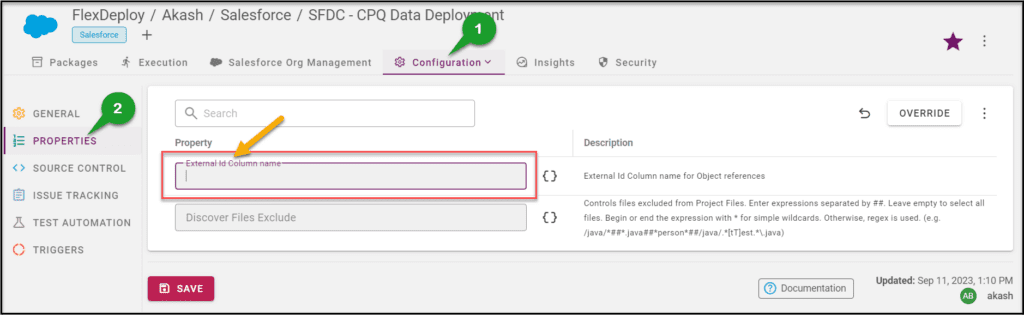
Step 4: Configuration of External IDs
After identifying the external IDs for custom objects, the next step is to enter the custom field API name in FlexDeploy’s Project Configuration → Properties section.
If you are maintaining the same external ID field name for all the objects you are trying to populate, such as “Name,” then you can enter the external ID directly as “All=Name”.
However, if you have different external ID fields for various objects, you should enter them as key=value pairs separated by commas in this property. The key should be your object’s API name, and the value should be the external field ID (field API name) for that object. You can use the key “All” as the default for all other objects.
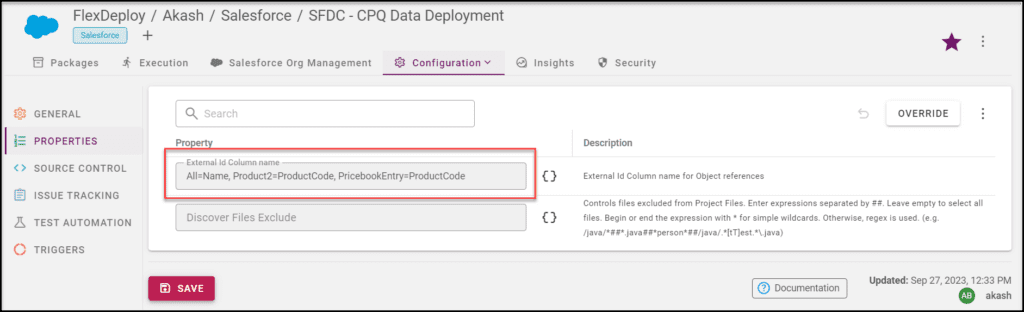
In this scenario, we will be using the “Name” field as External ID for all objects.All=Name
Step 5: Define Your Data Deployment Template
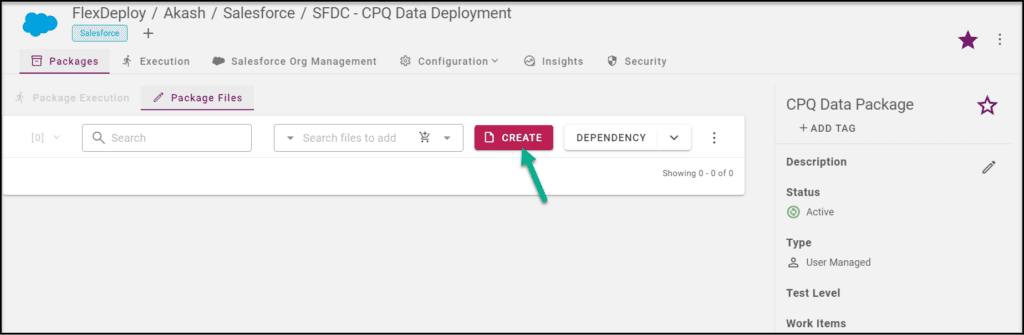
Create a package in FlexDeploy as you typically would. You can include both metadata files and data files in the same package. Next, create a Data File Type template.
This template serves as a blueprint for packaging and migrating specific CPQ objects data, such as products data and pricing data.
Use the ‘Create’ button to generate a new data object template file for migration (build and deploy). Begin by creating the template for the top-level object among your objects, and then repeat this process for all the objects in the desired sequence. If any objects were created in the wrong order, you have the flexibility to adjust the sequencing accordingly.
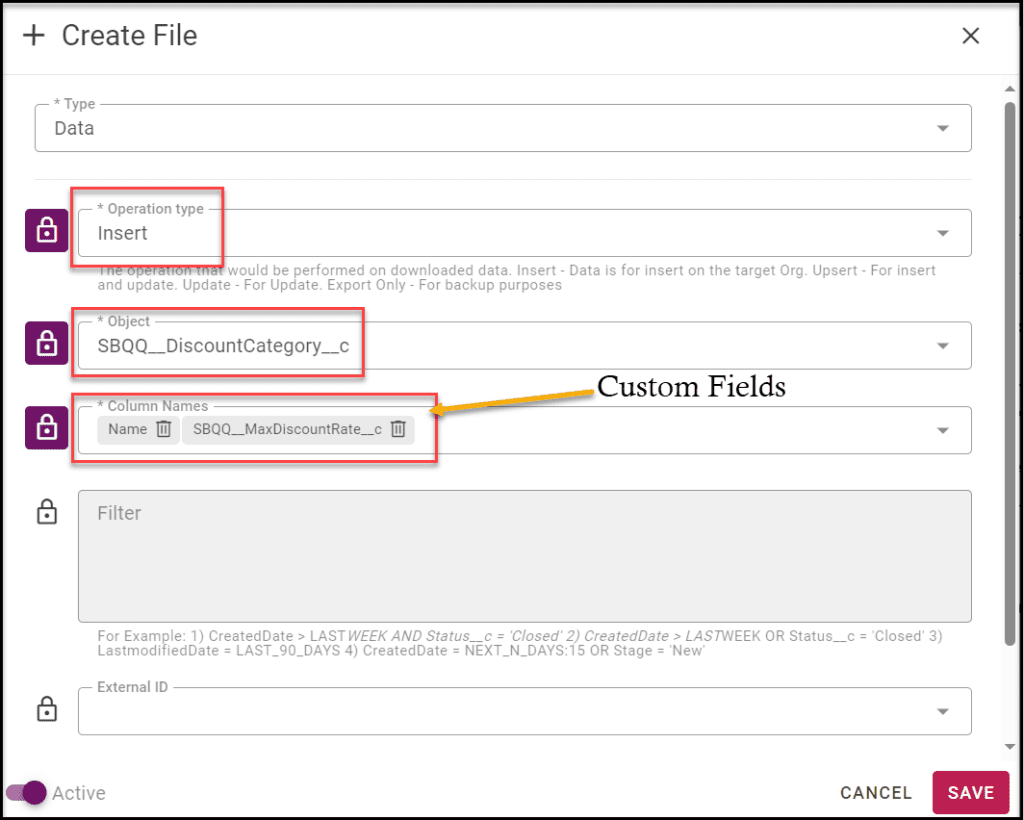
a. Begin by creating a data file for the Discount Category object, as it has no dependencies with other objects and therefore falls into the top-level category. Select the Operation Type as Insert and the Object as SBQQ__DiscountCategory__c. Choose all the columns (fields) you wish to migrate and save the configuration. There’s no need to select an External ID for the Insert operation.
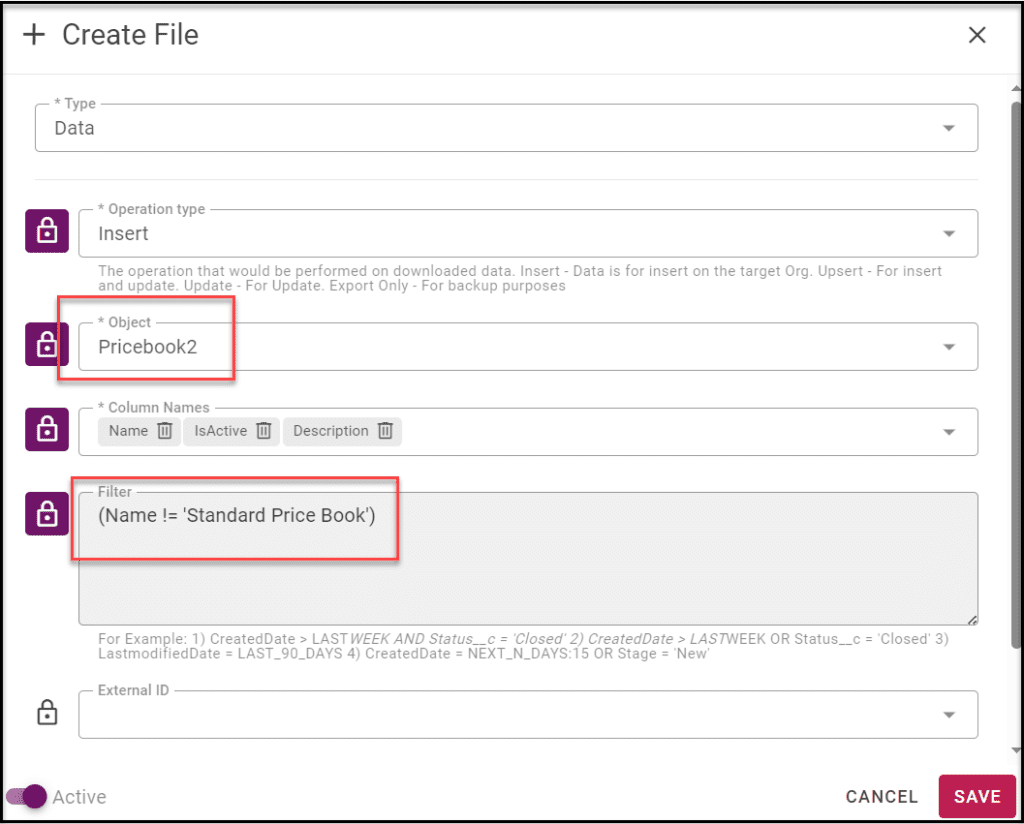
b. Similarly, we’ll create a data file for the Price Book, which also has no dependencies with other objects and is categorized at the top level. Select the Operation Type as Insert, Object as Pricebook2, and the desired columns (fields). If you want to migrate filtered records to the production environment, you can use a filter. In this case, we’ll use the filter (Name != 'Standard Price Book'). This filter is used because the Price Book record with the name “Standard Price Book” is constant and cannot be deleted or replaced. To prevent a “Duplicate Record” error, we must apply this filter.
c. Repeat the same steps to create a data file for the Product object. This object has a dependency on the Discount Category object, categorizing it at the second level. Following the sequence, Discount Category is categorized at the bottom level. Therefore, when selecting columns, do not include Discount Category [Reference] fields. We will update these fields after inserting Discount Category object records.
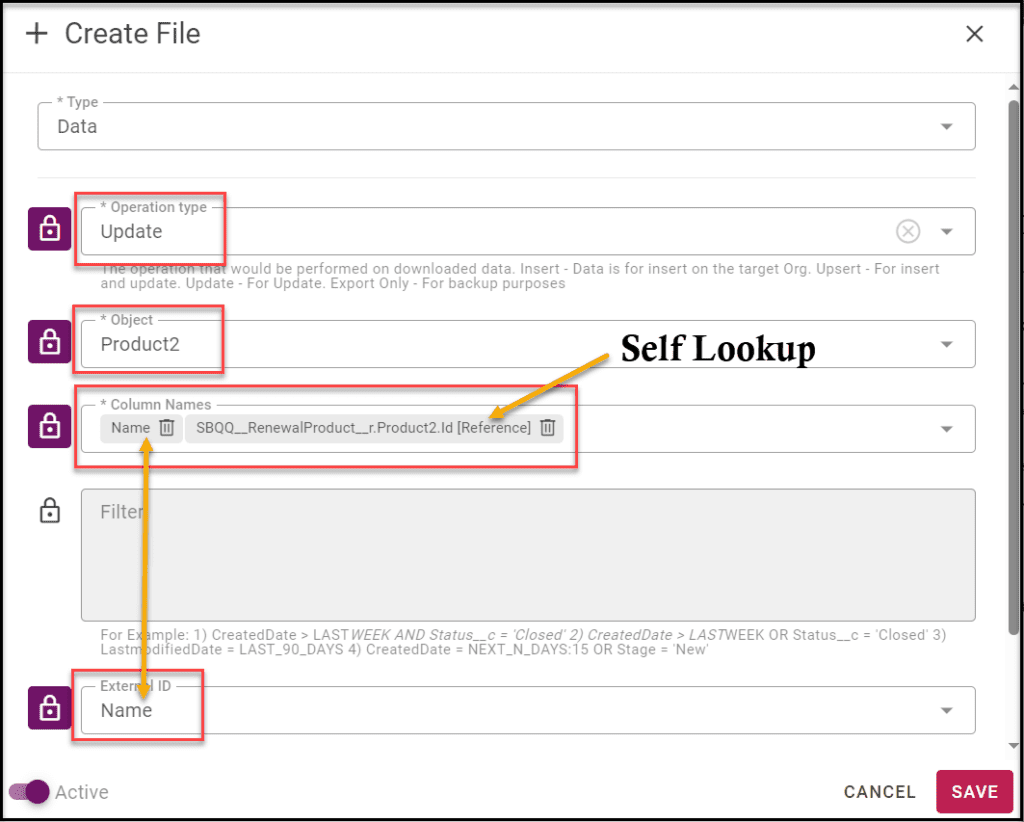
d. The Product object also has a relationship with itself. Create another data file for Product, but this time select the Operation Type as Update. When selecting columns (fields), include only Product [Reference] and External ID fields. Since the Operation Type is Update, choose the External ID as “Name”, ensuring it matches the configuration in the project properties and is also selected in the Column Names section.
e. Follow the same steps outlined in (a) for the Price Rule and Price Book Entry objects.
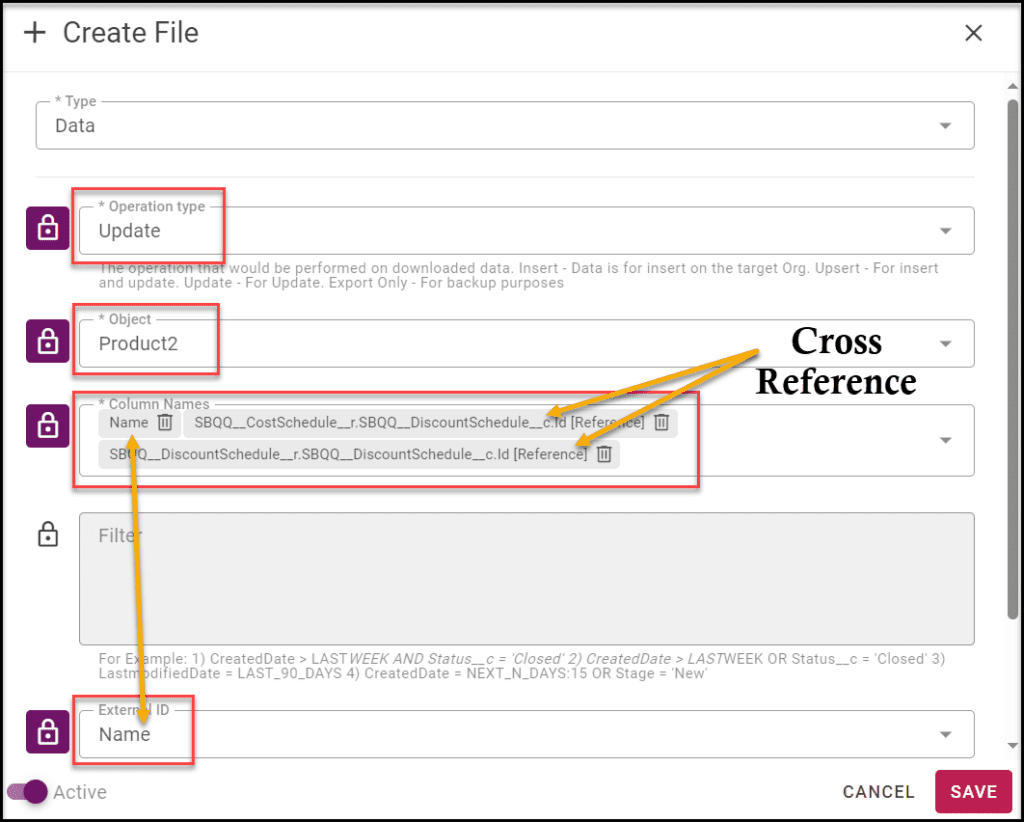
f. Now, the Discount Category object has dependencies with the Price Book and Product objects. Data files for these objects have already been added, so you can follow same steps to add the data file. Additionally, the Discount Category object has a self-lookup. For the self-lookup, follow the steps described in (d).
g. Finally, we will update Discount Category [Reference] fields for the Product object. To do this, create another data file for Product with the Update operation and select only the Discount Category [Reference] and External ID fields. Select the External ID as “Name” and save the configuration.
That’s it! Your complete package is now ready, with the objects’ data files organized in the appropriate sequence.
Step 6: Execute Build and Deployment
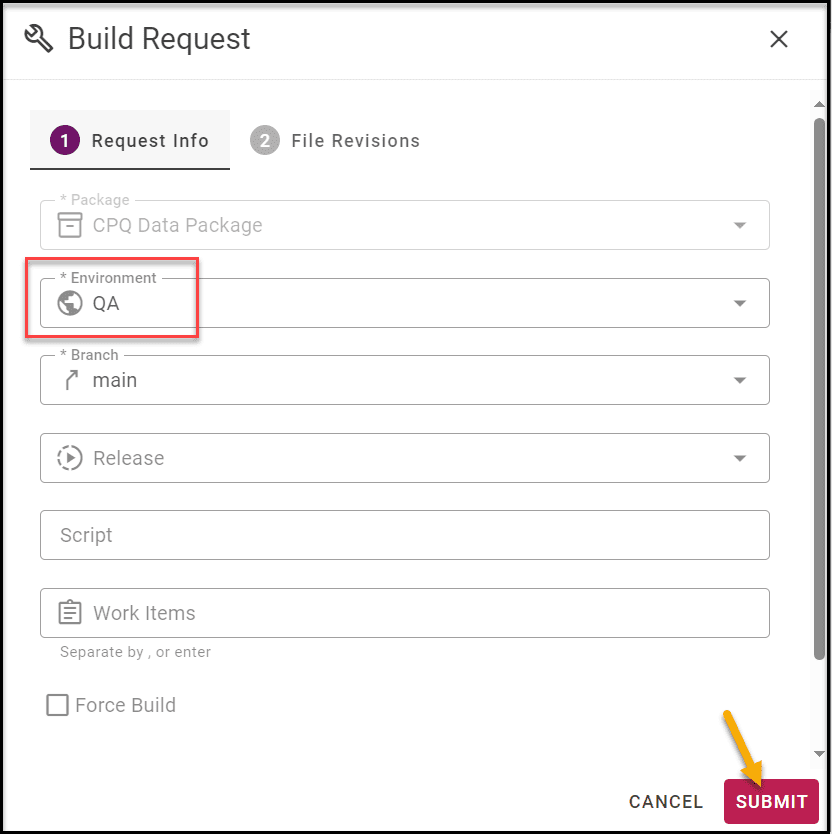
Build the package to connect to your Salesforce Source org. Navigate to the Package Execution tab to submit a build request for the desired package by clicking on Build.
After clicking Build, the Build Request Form will appear. In the Build Request Form, select the environment (e.g., Dev, QA, UAT) to specify from where you want to migrate the data (Sandbox).
Finally, click the Submit button to initiate the package build execution.
After submitting the build request, the Build Execution process will begin.
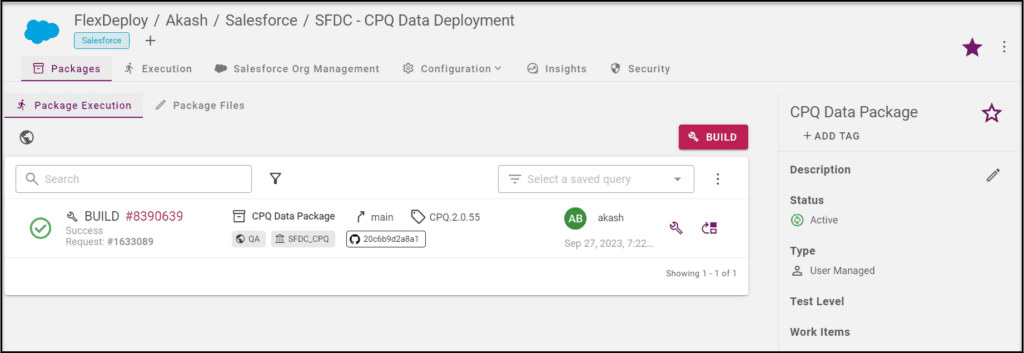
Once the Build Execution process is completed, the CSV files of the selected objects from the package will be automatically added to the FlexDeploy artifact repository. This artifact, which consists of CSV files, is now ready for deployment. You can access and download these CSV files from the ‘Build – Artifacts’ option.
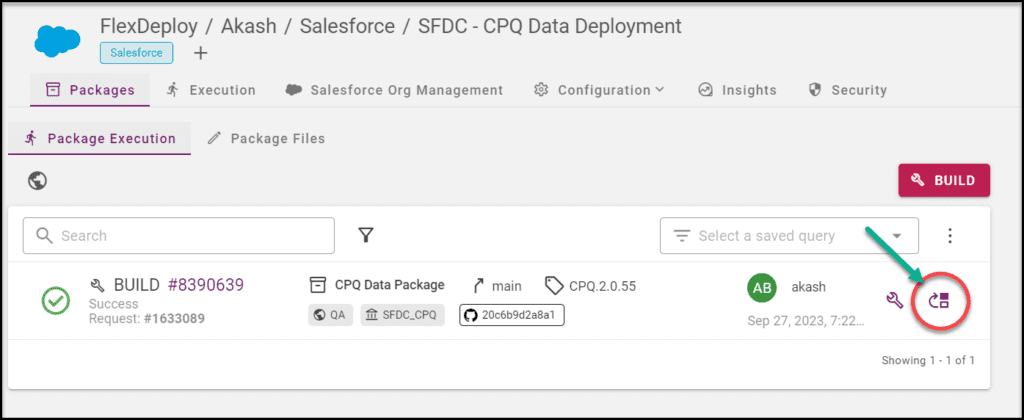
Now, click on the Deploy icon to submit a request to upload/migrate the data to the target environment (Production Org). Alternatively, you can also utilize the Release Management pipeline for data migration.
After clicking Deploy, the Deploy Request Form will appear. In the Deploy Request Form, select the environment (e.g., Prod, Test) to specify where you intend to migrate the data. Finally, click the Submit button to initiate the package deploy execution.
After successful deployment of data files, you will be able to view the deployment results in the “Deploy Execution – Reports” section.
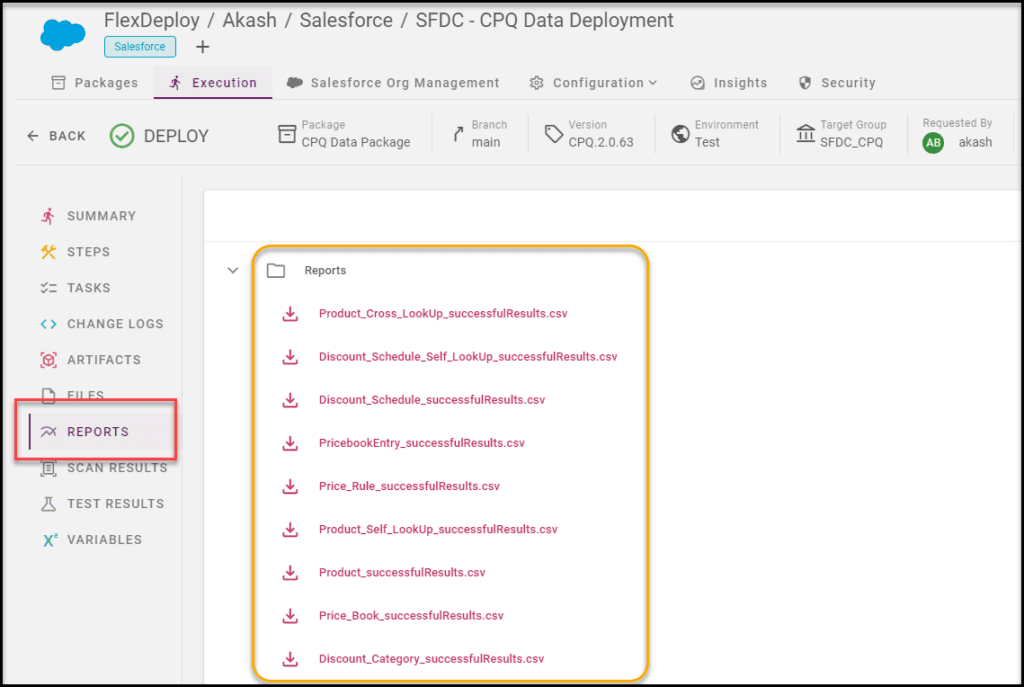
That’s it! The deployment is successful for CPQ products and pricing data along with cross-references and self-references from a sandbox environment to a production org using FlexDeploy.
For more information regarding CPQ Data Deployment, please refer to the Salesforce CPQ Data Deployments Tutorial.