This is the third article in our series on what makes FlexDeploy a perfect fit for Oracle E-Business Suite users. In this blog article I will walk through the core components of FlexDeploy, which enable the basics of build and deployment automation. I will demonstrate how to build and deploy Oracle E-Business Suite customizations across any number of environments. In the next two blog articles I will extend this example using other techniques to enable a most effective continuous delivery solution.
- FlexDeploy Loves Oracle E-Business Suite: Series Overview
- DevOps Best Practices for Oracle EBS
- FlexDeploy Loves Oracle E-Business Suite: Crawling
- FlexDeploy Loves Oracle E-Business Suite: Walking
- FlexDeploy Loves Oracle E-Business Suite: Running!
Workflows
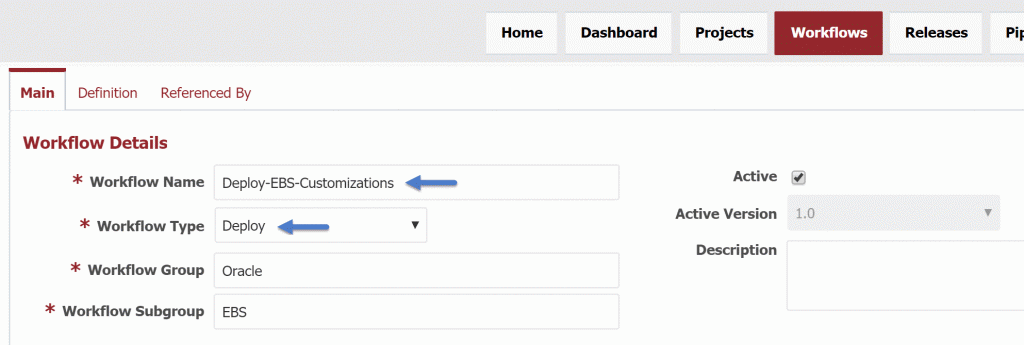
In FlexDeploy, workflows are a sequence of steps to implement the build or deployment for a technology into a single environment. There are several different types of workflows, but here we will focus on Build workflow and the Deploy workflow.
A build workflow is responsible for collecting the source and packaging it into an artifact, which is then versioned in FlexDeploy’s internal artifact repository. The deploy workflow is then responsible for taking a versioned artifact and “installing” it into the target server. There is typically one build workflow and one deploy workflow for a technology, as they are parameterized and executed in context of a project and the target environment. In other words, the deploy workflow is aware of the context it is being executed in and utilizes project/environment properties defined and managed externally.
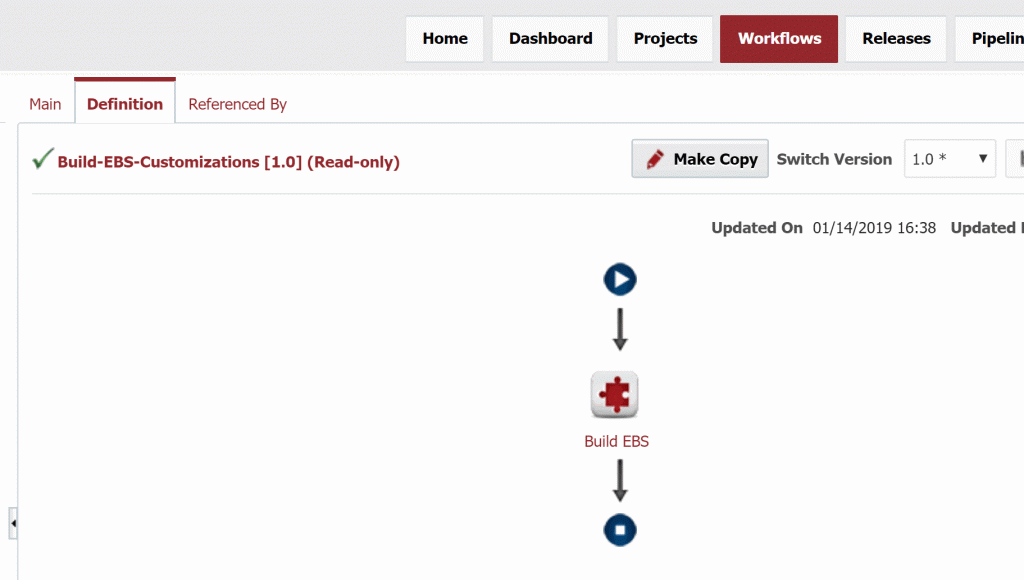
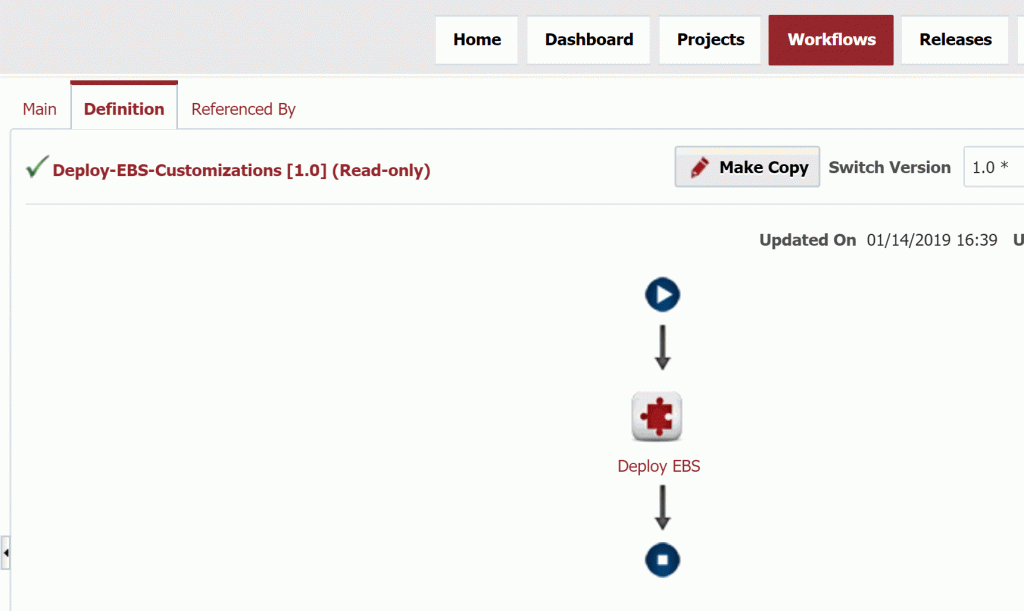
Workflows, while powerful, are generally very simple since they are task oriented. They are also simplified by making use of out of FlexDeploy plugins, which understand the underlying technologies and provide functions to perform the heavy lifting. In the case of EBS, the build and deploy workflow are both composed of just a single step.
The build workflow uses the build operation from the EBS plugin with default configuration.
Similarly, the deploy workflow uses the deploy operation from the EBS plugin, and again with the default configuration. That is all there is to it.
Unless we later want to add logic to implement specific use cases, we would never need to revisit the workflows again for Oracle EBS. A one time setup. Do not confuse a workflow with the orchestration of deploying across a series of environments. That is what is called a pipeline in FlexDeploy, and will be covered in the next blog article.
Topology
The topology defines the physical and logical architecture, environment specific properties, and connections to other tools. The logical architecture is defined by environments and instances. Examples of environments would be Development, Test, QA, and Production. These are logical in that they are not directly bound to any technology. An instance is specific to a technology, but not any specific environment. For example, if you have a single global EBS, which has physical installations in many environments, this is represented by a single logical FlexDeploy instance. If you have, for example, separate EBS installation stacks for North America and Europe, these would be represented by two instances.
For this blog article I have created four logical environments. The environments are simply a name without any additional configuration, other than to indicate builds will be performed in Development, and the other environments are for deployments only.
I have also created one logical instance, simply called EBS.
This instance I have associated with the four environments where I have EBS installations.

And I have indicated that build and deploy workflows for EBS will be executed on this instance.
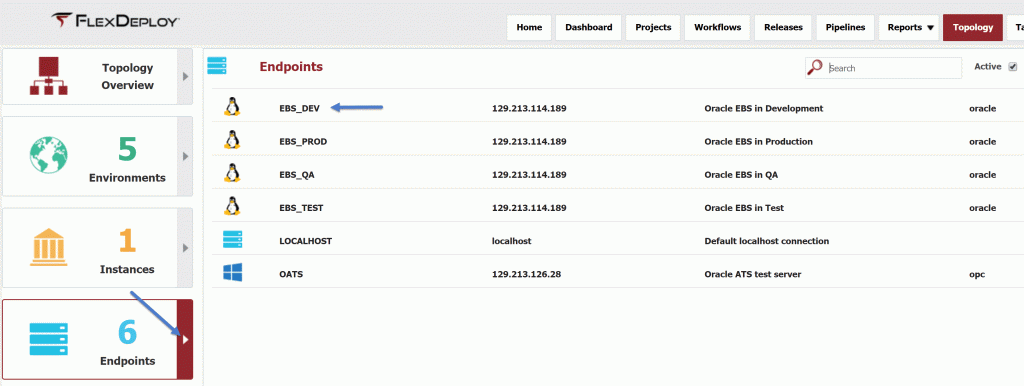
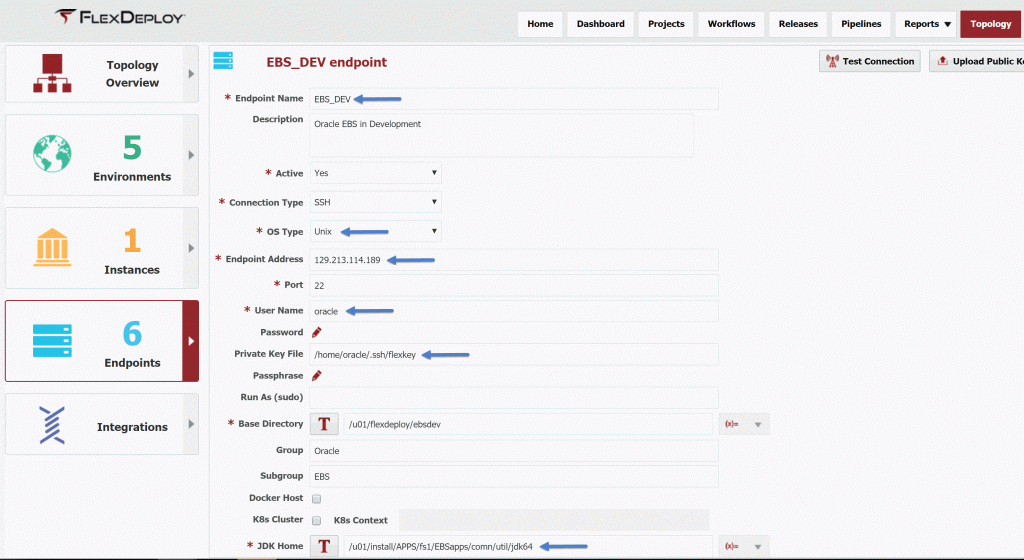
Now we will define the physical architecture, which is represented by what are called Endpoints. An Endpoint is an SSH connection to a physical server. The definition of the endpoint, in addition to a name, includes the host address, credentials (password, or SSH keys), a directory that resides on the host which can be used by FlexDeploy at runtime, and the location of the JDK installed on that server.
Last we will map our logical architecture to our physical architecture. Here, in the Topology Overview, since I mapped the EBS instance to the four environments, a configuration matrix is formed.
By clicking on the balloon for each environment I can bind it to the associated physical endpoint(s) and provide values for environment specific properties. Here I have indicated that EBS in Development has a single Endpoint called EBS_DEV. I have indicated that the Endpoint runs all EBS server components.
Since I mapped the EBS instance to the build and deploy workflows we created, the required and optional environment specific properties appear. I provide the values for these properties, as applicable for my Development EBS installation. The three properties include the database user (typically APPS), its password, and the path to the EBS environment script. I have completed the same endpoint mappings and property value configuration of the EBS instance for Test, QA, and Production.
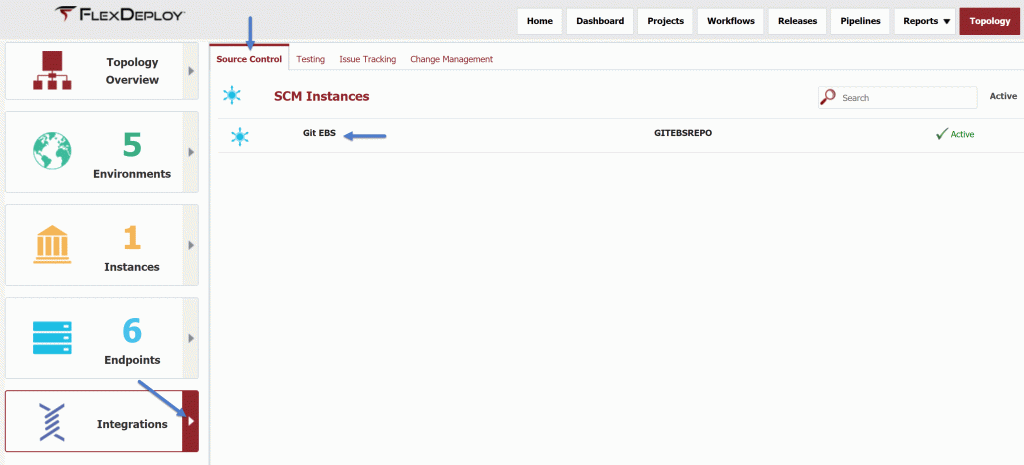
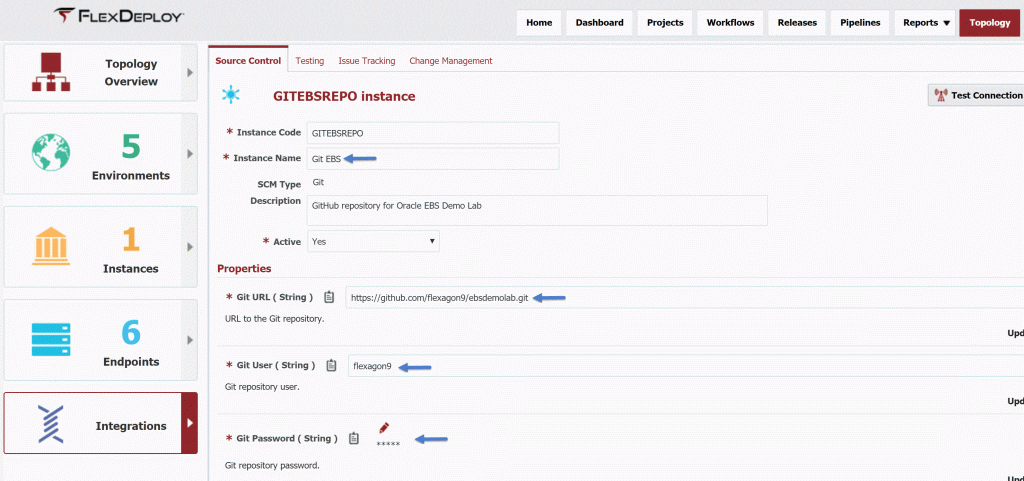
Finally, I will define a connection to my source control system. For this blog article I am using GitHub to host my EBS customization files. So I have created a connection to the repository, defined by a URL and the credentials.
That concludes the topology configuration. I could later add, for example, configuration for a UAT environment.
Projects
The next step in the configuration is to define one or more projects, which will be bound to the workflows and instances, an SCM repository and the source location within it. For Oracle E-Business Suite, there is typically one project for each Custom TOP. You might have one Custom TOP for your organization, or you may have many, broken out by module or a set of modules.
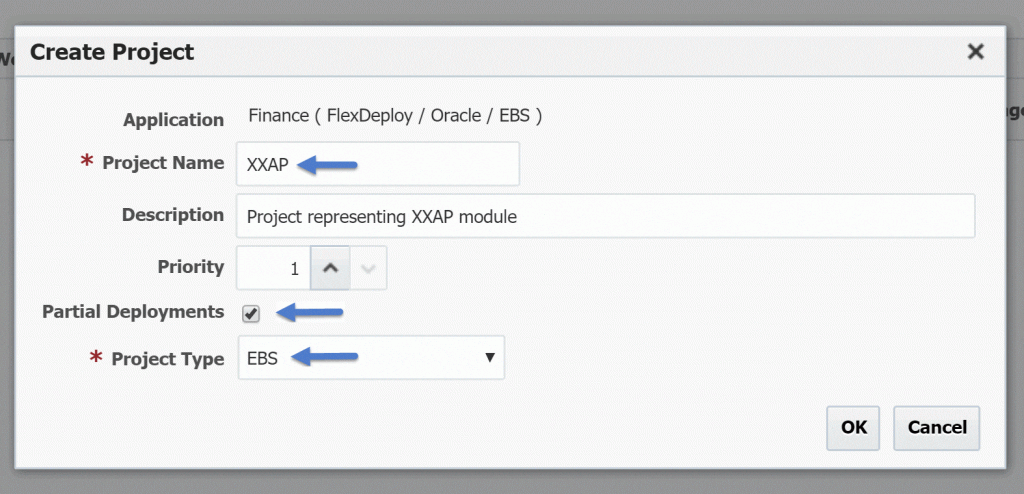
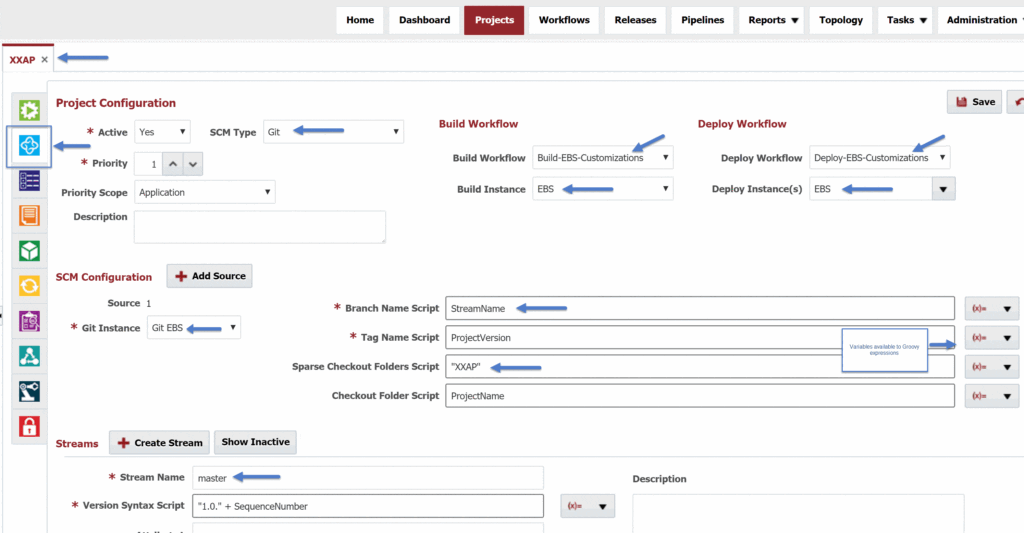
For this blog article I have created one project to manage customization files for my AP Custom TOP, called XXAP. When creating the project, I gave it a name of XXAP, indicated that it will be used for Partial Deployment, and set the project type to EBS. Partial Deployment in FlexDeploy is a mechanism which allows the assembly of individual files into what is called a package. The package is what is assembled and versioned during build, and “installed” during deployment.
After creating the project, I have set the following configuration on the Configuration tab.
The SCM type is set to Git, but there are options available for all popular source control systems. I have bound the workflows I created for EBS, and bound the build and deployment instance as EBS. Notice that the environment is not provide here, as the particular environment will be specified at request time during build and deployment.
Under the SCM Configuration, I have selected the Git Instance that I created in Topology. The SCM properties are specific to the SCM type, and the values are expressions implemented in the Groovy scripting language. Back to these in a moment.
The Streams below correlate to the branches in my Git repository from which I will be building. In this example, I have simply created a stream for the master branch, but I could add additional streams for other branches as required. Now back to the SCM instance properties. The Branch Name Script is set to use the StreamName variable. This will resolve to the Stream that is selected in the build request. The other property I will call attention to is the Sparse Checkout Folders Script. This is the path relative to the repository where the source is located for this project. For this example, my source is located in the “XXAP” folder within the configured Git repository.
If you recall from the first blog article in this series, DevOps Best Practices, I referenced Configuration by Convention. Notice that I have called my project XXAP, and by convention I have named the folders in Git matching my TOP names. To simplify configuration, and not have to change it for each project, I could set the Sparse Checkout Folder Script to ProjectName. When the project is built, the value will resolve accordingly at runtime.
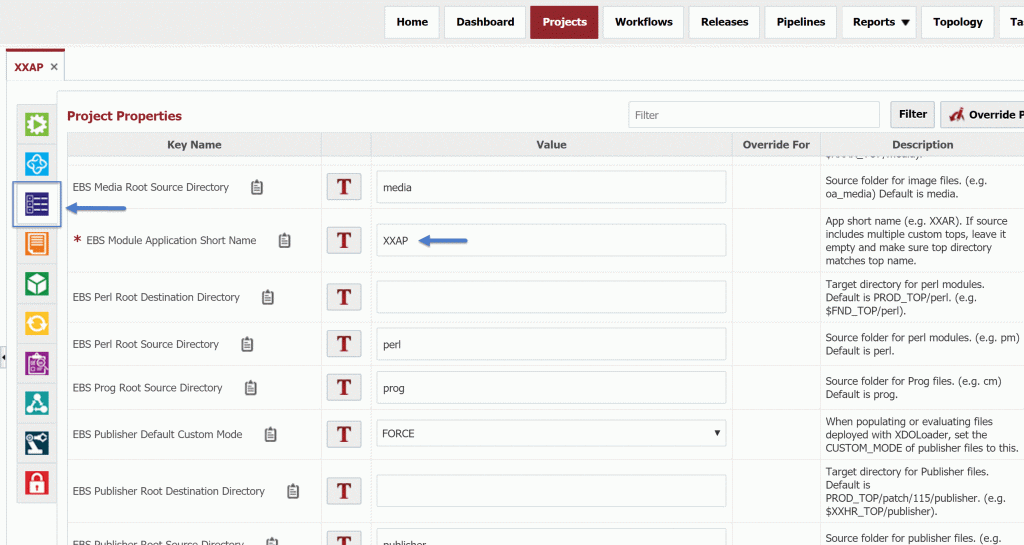
Now let’s switch over to the Properies tab. Since I bound the project to the EBS workflows, which use the EBS plugin operations, their project-scoped properties are displayed for this project. There are many optional properties which can be set to influence behavior, but there is only one required property, called EBS Module Application Short Name. This the module name for my Custom Top. I have set it to XXAP, but again we could make use of Configuration by Convention, and use a Groovy expression to set it to the project name.
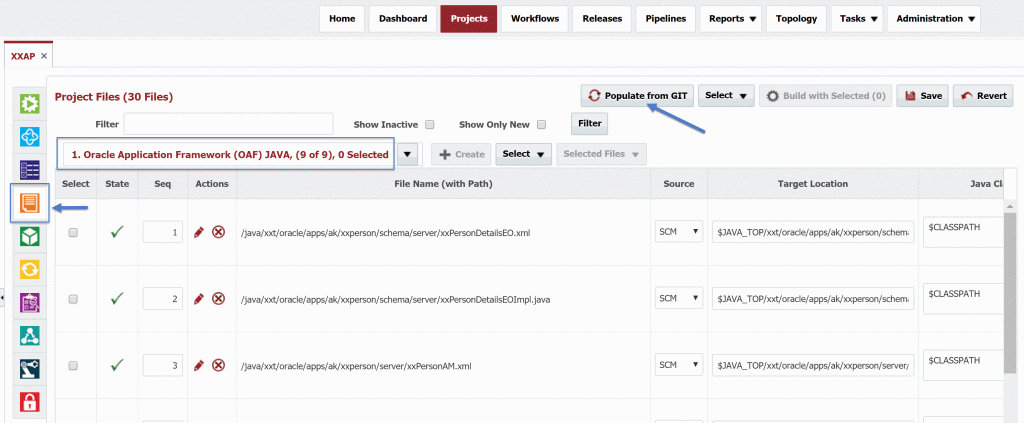
I referenced the term Partial Deployment when I created the project. Again, Partial Deployment allows the assembly of source files into a package. FlexDeploy gathers metadata about the files stored in source control on the Project Files tab. Here we can populate the metadata by clicking on the Populate from Git (or which ever SCM type is configurated on the project) button.
This metadata becomes the “catalog” (called Project Files) for building packages. The Project Files are organized by EBS object type, and include attributes about each file, ultimately generating the deployment command which will be used to “install” that file into the target environment during deployment. The sequence number within each type is the default order which they will be deployed through a package. You can re-sequence them in the catalog, and will have an opportunity to further adjust at request time. The catalog does not need to be populated again when you makes source control changes to existing files in the catalog, but rather only as you add new files which need to be included in your packages.
Adhoc Build & Deployments
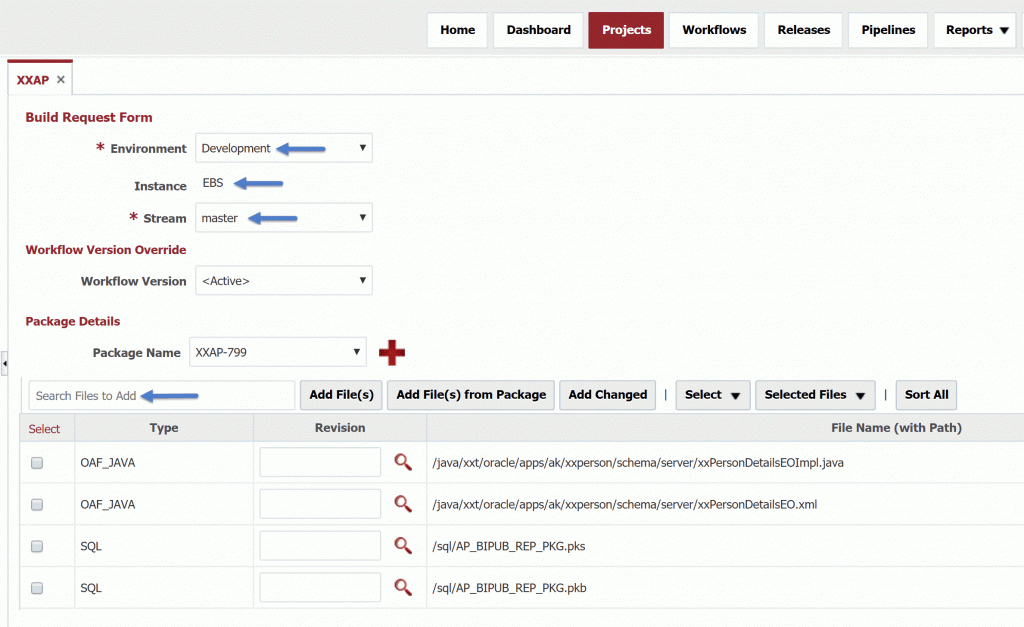
Now that we have completed the configuration, we are ready to execute build and deployments. To do this, we switch to the green Execution tab, and click on the Build->Select Files button.
Note that I only have one Build Environment, and one stream, so they are pre-selected for me. Next I click the + button to create a package. I will call it XXAP-799, but you can name as it makes sense for you (whether by a defect number, a CEMLI identifier, etc.) Next, I search for and add files to the package. Here I can enter/lookup specific SCM revision numbers, or leave blank to use the latest revision in the selected stream. Using the latest revision is most often the desired behavior. Click Submit Request to initiate the build request. We now see the build request and its execution being processed.
By clicking on the execution id, I can view the execution of the build workflow.

Notice the implicit step that was injected into the workflow. This step exports the source for the project (from the master branch) onto the FlexDeploy server. The next step is the single step from our build workflow, which executes on the endpoint mapped to the EBS instance in Development. This step compresses the source from the implicit step and produces the artifact. We can click on link to view logs.
Once the build is complete you will will see the generated artifact on the Artifacts tab. On the Files tab you will see the contents of the artifact, along with the SCM revision number and the commit details corresponding to it. The resulting artifact is versioned in the artifact repository using the the generated Project Version number.

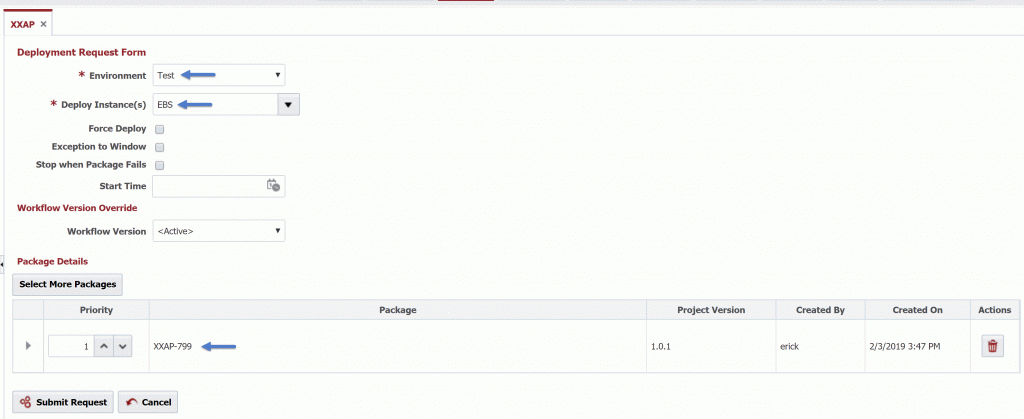
If I go back to the main execution screen I can submit deployment requests to deploy the project version into one or more environments. I click on the “three gear” icon next to the project version number of the completed build request. This will launch the deployment request form for the package package.
Here I select the target environment and submit the request. Now we see the deployment request and its corresponding execution.
When drilling into the execution we see the steps of the deployment workflow. After completion, the Files tab shows the deployment status of each file. Here we can see that all of the files were successful deployed, and the workflow execution itself is successful. Again, we can drill into the logs for the deployment to see the deployment command that were executed and the resulting output.
Conclusion
In this blog article I have shown the steps to configure FlexDeploy as an automation solution for building and deploy Oracle E-Business Suite customizations across various environments. Configuration included one time setup for workflows, topology, and projects. The core setup positions us for making adhoc requests to assemble source changes from Git into packages, and deploy them into any environment. In the next two blog articles we will build on this solution to transform the adhoc process into a continuous delivery machine, enabling faster delivery with efficiency.
Previous Post: DevOps Best Practices for Oracle EBS
Next Post: FlexDeploy Loves Oracle E-Business Suite: Walking


